

Syed Anas Hussain
June 5, 2026 • Updated June 5, 2026
12 mins Read
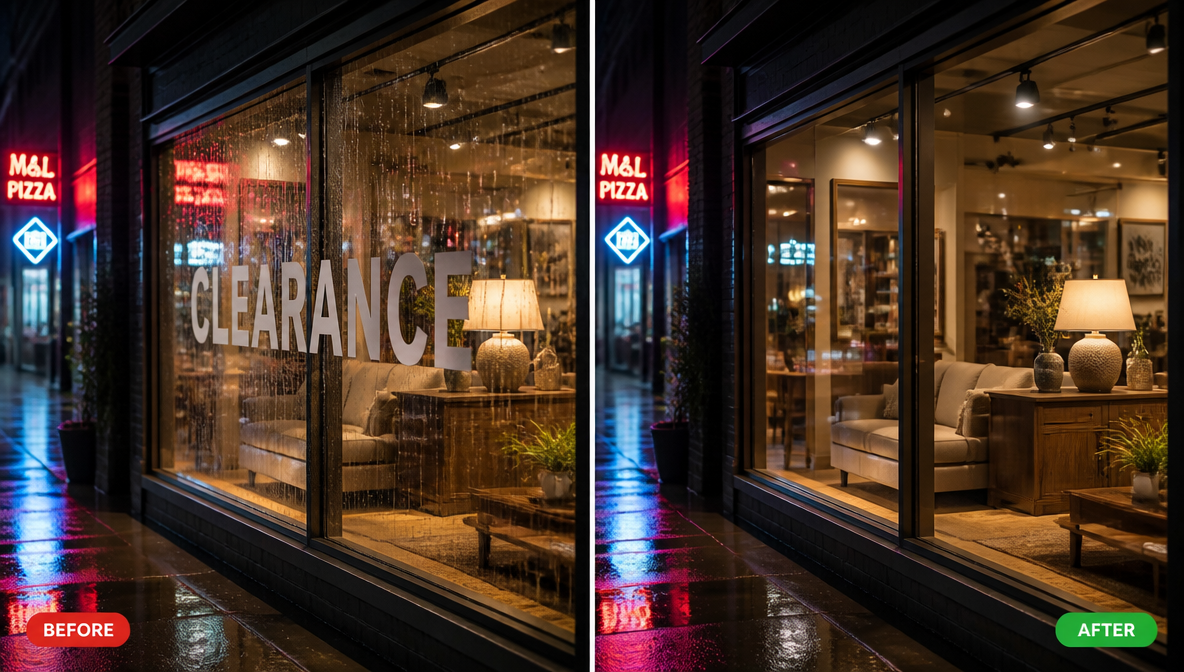
Editing text in an image without Photoshop is one of those tasks that sounds simple until you actually try to do it. I spent the better part of an afternoon once trying to fix a single typo on an exported promotional banner before I found a workflow that took three minutes. The problem was not the typo. It was that the image was flattened, the original file was inaccessible, and Photoshop's approach to this specific problem is more involved than a simple correction deserves. That experience pushed me toward AI tools and eventually toward ImagineArt Magic Text, which changed how I handle every image text edit I do now.
Thus, I am writing this to cover everything I learned along the way: what the actual difficulty is, when this task comes up most often, how to do it properly, and the mistakes worth avoiding before you make them yourself.
What Does It Mean to Edit Text Image?
Editing text in an image means changing, replacing, or removing text that has been baked into a flattened image file, like a JPEG or PNG, rather than a layered design file where text exists as a separate editable element. When a designer exports a finished banner, or when you download a template as a flat image, the text becomes part of the pixel grid. It no longer exists as a distinct layer you can click and retype.
This is different from adding a text overlay on top of an image, which most tools support easily. Editing existing baked-in text requires the tool to detect which pixels form letters, understand their visual style, remove them cleanly, and either insert new text that matches the original or fill the background where the text used to be. Those are four genuinely hard technical problems, and the difference between tools that handle them well and those that handle them poorly is significant.
Why Editing Text in a Flattened Image Is So Difficult
The word "flattened" is the key to understanding why this task is harder than it looks. When a design file is exported to JPEG or PNG, all of its individual layers, text, graphics, backgrounds, and effects, are merged into a single layer of pixels. The software that created it no longer distinguishes which pixels were text. They are all just color values in a grid.
This creates three compounding problems:
Identifying the text boundary. Without layer separation, you have to manually select exactly the right group of pixels to edit. Miss a few pixels at the edge and the edit looks patchy. Select too wide and you start removing parts of the background.
Matching the original font. The original typeface is no longer accessible as font data. You have to visually identify it, search for a matching font, download it if you do not own it, then manually set the correct size, weight, color, letter spacing, and any effects like shadows or outlines. Even experienced designers get this slightly wrong.
Reconstructing the background. When you erase original text, the pixels beneath it are gone. If the background is a solid color, filling it is trivial. If the background is a photograph, a texture, a gradient, or any kind of complex imagery, you have to manually rebuild what should be there using clone stamp or content-aware fill. On complex backgrounds, this can turn a two-minute fix into a 40-minute project.
These three problems are why Photoshop ends up being the default suggestion even for simple corrections. It is powerful enough to handle all three, but that power comes with a skill requirement and time cost that most people do not want to absorb for a basic text fix.
How to Edit Text in an Image Without Photoshop: Step by Step
Magic Text is ImagineArt's dedicated image text editing tool. It handles detection, font matching, and background reconstruction automatically — no compositing knowledge, no layer management, no design software required. Here is the full step-by-step process:
Step 1: Upload your image
Go to imagine.art/edit/magic-text and upload your image. Supported formats are JPG, PNG, and WEBP up to 25MB. Use the highest quality version of the source file available — compression artifacts in the source will affect reconstruction quality in the output.
Step 2: Let the AI scan and detect all text
Once uploaded, the tool automatically scans the image and identifies every text element. This takes approximately 10 to 20 seconds. You do not need to select or highlight anything manually. The AI finds text blocks, headlines, subheads, captions, and labels across the full image.
Step 3: Click the text block you want to change
The detected text blocks become individually selectable. Click the specific block you want to edit. The text content becomes editable and the tool displays the font matching information it has identified for that block.
Step 4: Type your replacement text
Type the new copy directly into the edit field. The AI applies the font match — family, weight, size, color, letter spacing, and effects like drop shadows — to your replacement text automatically.
Step 5: Adjust font weight or letter spacing if needed
For standard fonts the automatic match is usually accurate enough to use without adjustment. For custom typefaces or tightly tracked display text, manually fine-tune the weight and letter spacing until the replacement visually matches the original treatment.
Step 6: Download the finished image
Download the edited image. Zoom in to the edited area at full resolution before downloading to catch any subtle artifacts or font mismatches at actual viewing size.
For text removal instead of replacement, the process is identical through Step 3. Delete the text content entirely rather than replacing it, and the AI fills the background before download. Simple single-text corrections typically take under three minutes from upload to download.
What AI Changes About Editing Text in Images
AI image text editors solve all three problems with a fundamentally different approach. Instead of asking you to handle detection, font matching, and background reconstruction manually, the AI handles them automatically.
OCR detection finds the text in the image automatically. You do not select pixels. The tool identifies which regions contain text and makes them editable directly.
Font matching algorithms analyze the visual characteristics of the original text, including letterform proportions, weight, spacing, and color, then identify the closest available font and apply it to your replacement content. The match is not always exact, but it is dramatically faster than manual searching and accurate enough for most standard typefaces.
AI inpainting handles background reconstruction. When text is removed or replaced, the AI analyzes surrounding pixels and generates what the background should look like in the vacated space. On solid, graduated, or simple backgrounds this is essentially invisible. On complex photographic backgrounds the quality varies by tool but is consistently faster and cleaner than manual reconstruction.
ImagineArt Inpaint tool is the underlying technology powering this background reconstruction inside Magic Text. If you want to understand how inpainting works in more depth — or use it independently for broader image editing tasks — the Inpainting Image with AI guide covers the full workflow.
The combined result: an edit that takes 20 to 40 minutes in Photoshop takes 2 to 5 minutes with a capable AI text editor. The manual skill requirement drops to near zero. If the image needs more than a text correction, ImagineArt's broader AI image editor includes Inpaint, Outpaint, and Relight in the same workspace.
When Do You Actually Need to Edit Text in an Image?
Recognizing these situations as AI-solvable, rather than something that requires design software, is half the value. These are the use cases I run into most frequently.
Fixing a typo after export. The most common scenario. A graphic was exported and distributed, then a typo surfaced. The source file is unavailable, on a different machine, or would take more time to locate and re-export than the fix warrants. Upload the image, correct the text, download.
Updating promotional dates, prices, or event details. Marketing assets expire constantly. A sale price changes. An event date shifts. The original file might be in a tool the company no longer subscribes to, or was created by someone who has left. Edit the exported image directly rather than chasing the original.
Translating or localizing image content. Taking an English campaign asset and producing a Spanish, French, or Japanese version traditionally required returning to the design layer. Replacing the visible text in the exported image covers most localization needs for standard marketing formats without the design round trip.
Removing watermarks or unwanted text. A credit line baked into a licensed image. A date stamp from a camera. Placeholder text that should not appear in the final version. Text removal deletes the content and fills the background cleanly.
Updating product listing images. E-commerce product images often have price labels, specification callouts, or promotional overlays. When those details change, editing the image directly is faster than requesting a new asset from the design team. If you work heavily with product photography, the best AI image editor for photographers guide covers the broader editing toolkit worth knowing alongside Magic Text.
Personalizing template assets. Downloaded templates that arrived as flat image files rather than editable design files have placeholder text that needs replacing for each use. Magic Text treats the flat file as if the text layers were still accessible.
Creating and refining album covers. Album art frequently arrives as a flattened export with the artist name, album title, or track listing baked into the image. When details change — a title update, a featuring credit, a release year correction — the only options are returning to the original design file or editing the exported image directly. Magic Text handles this in minutes: detect the text, replace the copy, preserve the font treatment and background.
For creators building album artwork from scratch using AI image generation, the AI in Music: Designing Album Covers with AI Image Generation guide covers the full creation workflow that Magic Text slots into at the correction and refinement stage.
How to Edit Text in an Image Without Photoshop: Step by Step
Now that you understand how AI handles these problems, here is a quick recap of the process:
- Upload your image at imagine.art/edit/magic-text, supporting JPG, PNG, and WEBP up to 25MB
- Wait for the AI to scan and detect all text areas, this takes about 10 to 20 seconds
- Click the specific text block you want to change
- Type your replacement text into the edit field
- Adjust font weight or letter spacing if the automatic match needs minor refinement
- Download the finished image
For text removal instead of replacement, the process is identical through step 3. Delete the text content entirely and the AI fills the background before you download.
Simple single-text corrections typically take under three minutes from upload to download. Images with multiple text elements to update take longer but remain faster than any manual alternative for the same quality output.
Common Mistakes When Editing Text in Images
I have made most of these. They are worth knowing before you start rather than after you have downloaded a result that looks slightly wrong.
Not reviewing at full resolution before downloading. Background fill artifacts and subtle font mismatches that look fine in the thumbnail become obvious when you zoom to 1:1. Always zoom in on the edited area before exporting. Catching it now takes 30 seconds. Catching it after distribution does not.
Expecting perfect font matching on custom typefaces. AI font matching performs well on standard and common display fonts. On custom brand typefaces, hand-lettered text, and heavily stylized decorative fonts, the match will be approximate. Expect to manually adjust weight and letter spacing on these cases.
Uploading a heavily compressed source file. JPEG compression artifacts make both text detection and background reconstruction harder. The more compressed the source image, the more likely the output will show artifacts at edit points. Use the highest quality version of the image available when you have the choice.
Trying to edit text on an extremely complex background. AI inpainting handles most backgrounds well. It struggles most with fine repeating textures, high-detail photography with active content directly behind the text, and text that is partially transparent or shadow-blended into the background. These cases work but may need an extra round of manual refinement.
Missing multiple instances of the same text. In marketing assets, the same text element sometimes appears in more than one location: a headline and a footer, or a price shown in two places. Edit all instances in one session before downloading.
What to Do When the Font Match Does Not Look Right
If the replacement text looks visibly different from the original after the AI applies the font match, three adjustments fix most cases.
The font weight is usually the issue. Regular, medium, and bold of the same font family look similar at small sizes and obviously different at display sizes. Adjust the weight first before assuming the font family itself is wrong.
Letter spacing matters especially for logo text, premium brand typography, and any headline that was originally tightly tracked. AI replacement tends to default to normal spacing. Tightening it manually usually resolves the remaining visual difference.
If the background fill behind the replaced text has a visible edge or texture seam, zooming in and applying a local correction within the tool will clean it up. On most standard images this is not needed. On complex photographic backgrounds it comes up occasionally.
For a head-to-head comparison of which tools handle difficult font matching cases best, the 6 best AI image text editors guide covers the full breakdown. And if the edit goes beyond text and you want to change the image's visual style entirely, the AI style transfer guide covers that workflow.
Frequently Asked Questions
Editing text in an image means changing, replacing, or removing text that has been baked into a flattened file like a JPEG or PNG. AI tools detect the text using OCR, let you replace or delete the content, match the original font automatically, and rebuild the background where the text was. This is different from adding a text overlay, which is a simpler operation.
Once text is flattened into a JPEG or PNG, Photoshop treats it as pixels rather than as text. You cannot click and retype it. You have to manually erase the letters, rebuild the background underneath, and add new text that matches the original font. AI tools automate all three of those steps and complete the same fix in a fraction of the time.
Font matching accuracy depends on how standard the original font is. Common and widely used typefaces match very closely. Custom brand fonts, hand-lettered text, and heavily stylized decorative typefaces produce an approximate match that needs manual weight and spacing adjustment. For standard marketing and design fonts, the automatic match is usually close enough to use without adjustment.
Yes. Screenshots are one of the most common use cases because text in them is typically high contrast and sits on a relatively clean background. App screenshots, browser captures, and presentation slides all work well with AI text editors.
Replacing text swaps the original content for new copy while preserving the font style and visual treatment. Removing text deletes it entirely and fills the background using AI inpainting to leave a clean image with no text. Both operations are available in Magic Text and use the same upload and detection process.
No. AI text editors handle detection, background reconstruction, and font matching automatically. You need to click the text you want to change and type the replacement. No layers, no tool proficiency, and no design background required.
Fixing a typo in an exported image or updating a promotional date does not need Photoshop. It needs a few minutes and the right tool.
Syed Anas Hussain
Syed Anas Hussain is a computer scientist blending technical knowledge with marketing expertise and a growing passion for AI innovation. Curious by nature, he dives into new AI sciences and emerging trends to produce thoughtful, research-led content. At ImagineArt, he helps audiences make sense of AI and unlock its value through clear, practical storytelling.