
Tooba Siddiqui
Tue Jan 14 2025 • Updated Wed Jun 03 2026
11 mins Read
The AI interior design market reached $1.09 billion in 2024 and is projected to hit $7.75 billion by 2032 — and the reason is straightforward: professional interior designers charge $2,000–$5,000 per room, while AI now produces comparable visualization quality in under a minute, free.
This guide explains exactly how to use AI for interior design across three workflows: redesigning a room from a photograph, converting a sketch or floor plan into a photorealistic 3D render, and generating a video walkthrough of a designed space. ImagineArt has a dedicated app for each, all accessible on a free tier with 100 daily credits and no design experience required.
What Is AI for Interior Design?
AI for interior design refers to tools that use generative AI to visualize, redesign, and present interior spaces — from uploading a room photo to receive an instant redesign, to converting a hand-drawn sketch into a photorealistic 3D render, to generating a video walkthrough for client presentation. The input is a photograph, drawing, or text description. The AI handles the visualization.
In 2026, 65% of interior designers have integrated AI tools into their workflows — not because AI replaces design thinking, but because it eliminates the hours of revision cycles between concept and client approval. For homeowners, it prevents costly decisions made from imagination alone. For real estate professionals, properties marketed with virtual staging sell 40% faster than those without.
How to Use AI for Interior Design with ImagineArt
Using AI for interior design follows a clear process — from defining your concept through to presenting the finished result. Here is the complete workflow using ImagineArt's three dedicated interior design apps.
Step 1: Define Your Style and Design Brief
Before using any tool, spend five minutes answering three questions: what mood do you want the space to convey, what visual style fits that mood, and what color palette represents it. This becomes the foundation of every prompt you write.
Be specific rather than vague. "Cosy and modern" generates inconsistent outputs. "Japandi minimalism, warm oak wood tones, linen textures, soft morning light, neutral palette of cream and sand" generates a predictable, controlled result every time.
If you are unsure which style fits your space, our guide to interior design styles covers the key aesthetics — from Scandinavian and Mid-Century Modern to Brutalist and Biophilic — with visual descriptions that translate directly into prompts.
Step 2: Visualize Your Existing Space from a Photo
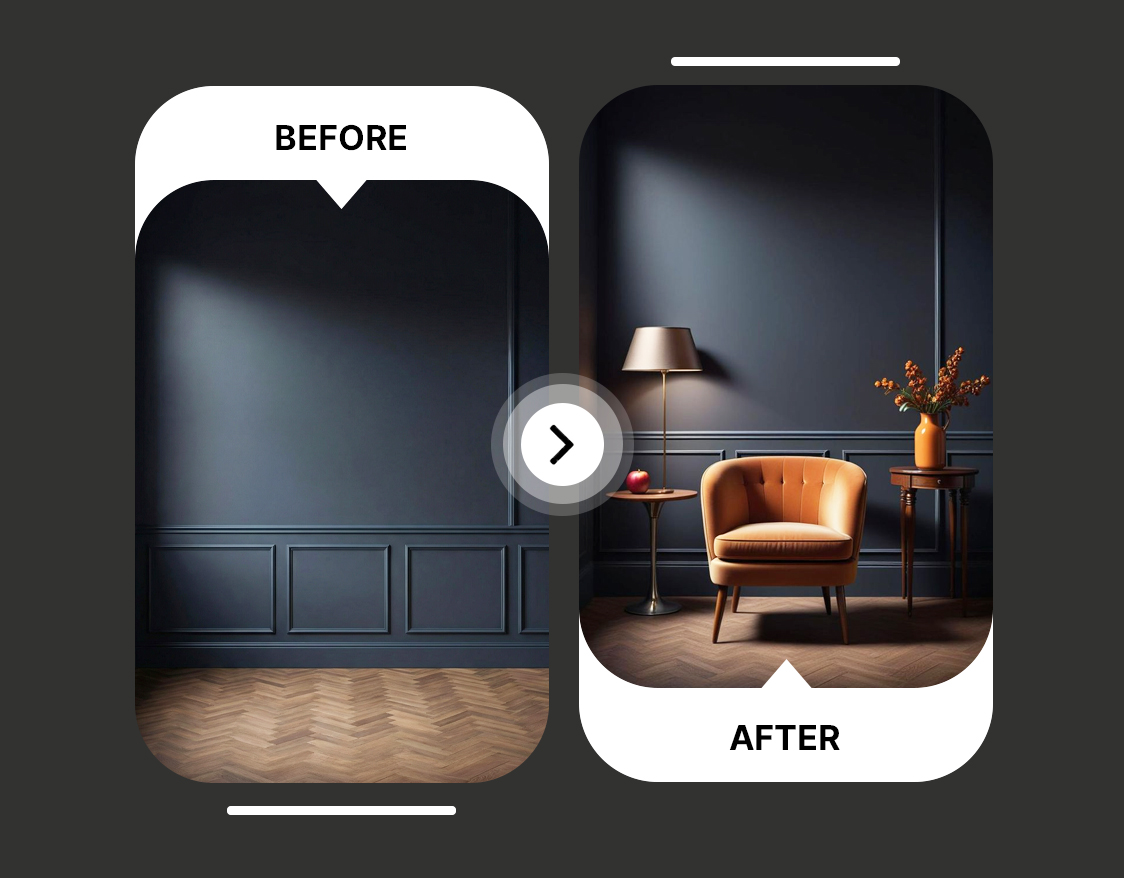
With your brief defined, upload a photograph of your room to ImagineArt AI interior design app and generate a well-designed version of the space based on your description.
Take a well-lit smartphone photo from a corner of the room that captures the full space — this gives the AI the most complete picture of layout, dimensions, and existing elements to work with.
How to do it:
- Upload your room photo and select the room type
- Paste your style description into the prompt field
- Generate your first well-designed version of the space
The AI handles realistic furniture placement, scale accuracy, and material rendering relative to your actual room — not a generic template. Your first generation will not be final, but it will immediately tell you whether your brief is translating the way you intended.
Step 3: Iterate and Compare Design Directions
Run multiple generations from the same photo, adjusting one element at a time, until you have 3–5 distinct directions to evaluate.
The most common mistake at this stage is stopping at the first output. The first generation is a direction-finder. The best result almost always comes from iteration.
Change the lighting description to shift the mood. Swap the furniture style from minimal to layered. Shift the palette from warm to cool. Each adjustment produces a meaningfully different output from the same room photo, giving you real alternatives to compare rather than a single interpretation to approve or reject.
Use ImagineArt's side-by-side comparison to evaluate the variations together, identify what is working across them, and consolidate into a single chosen direction before moving to the next stage.
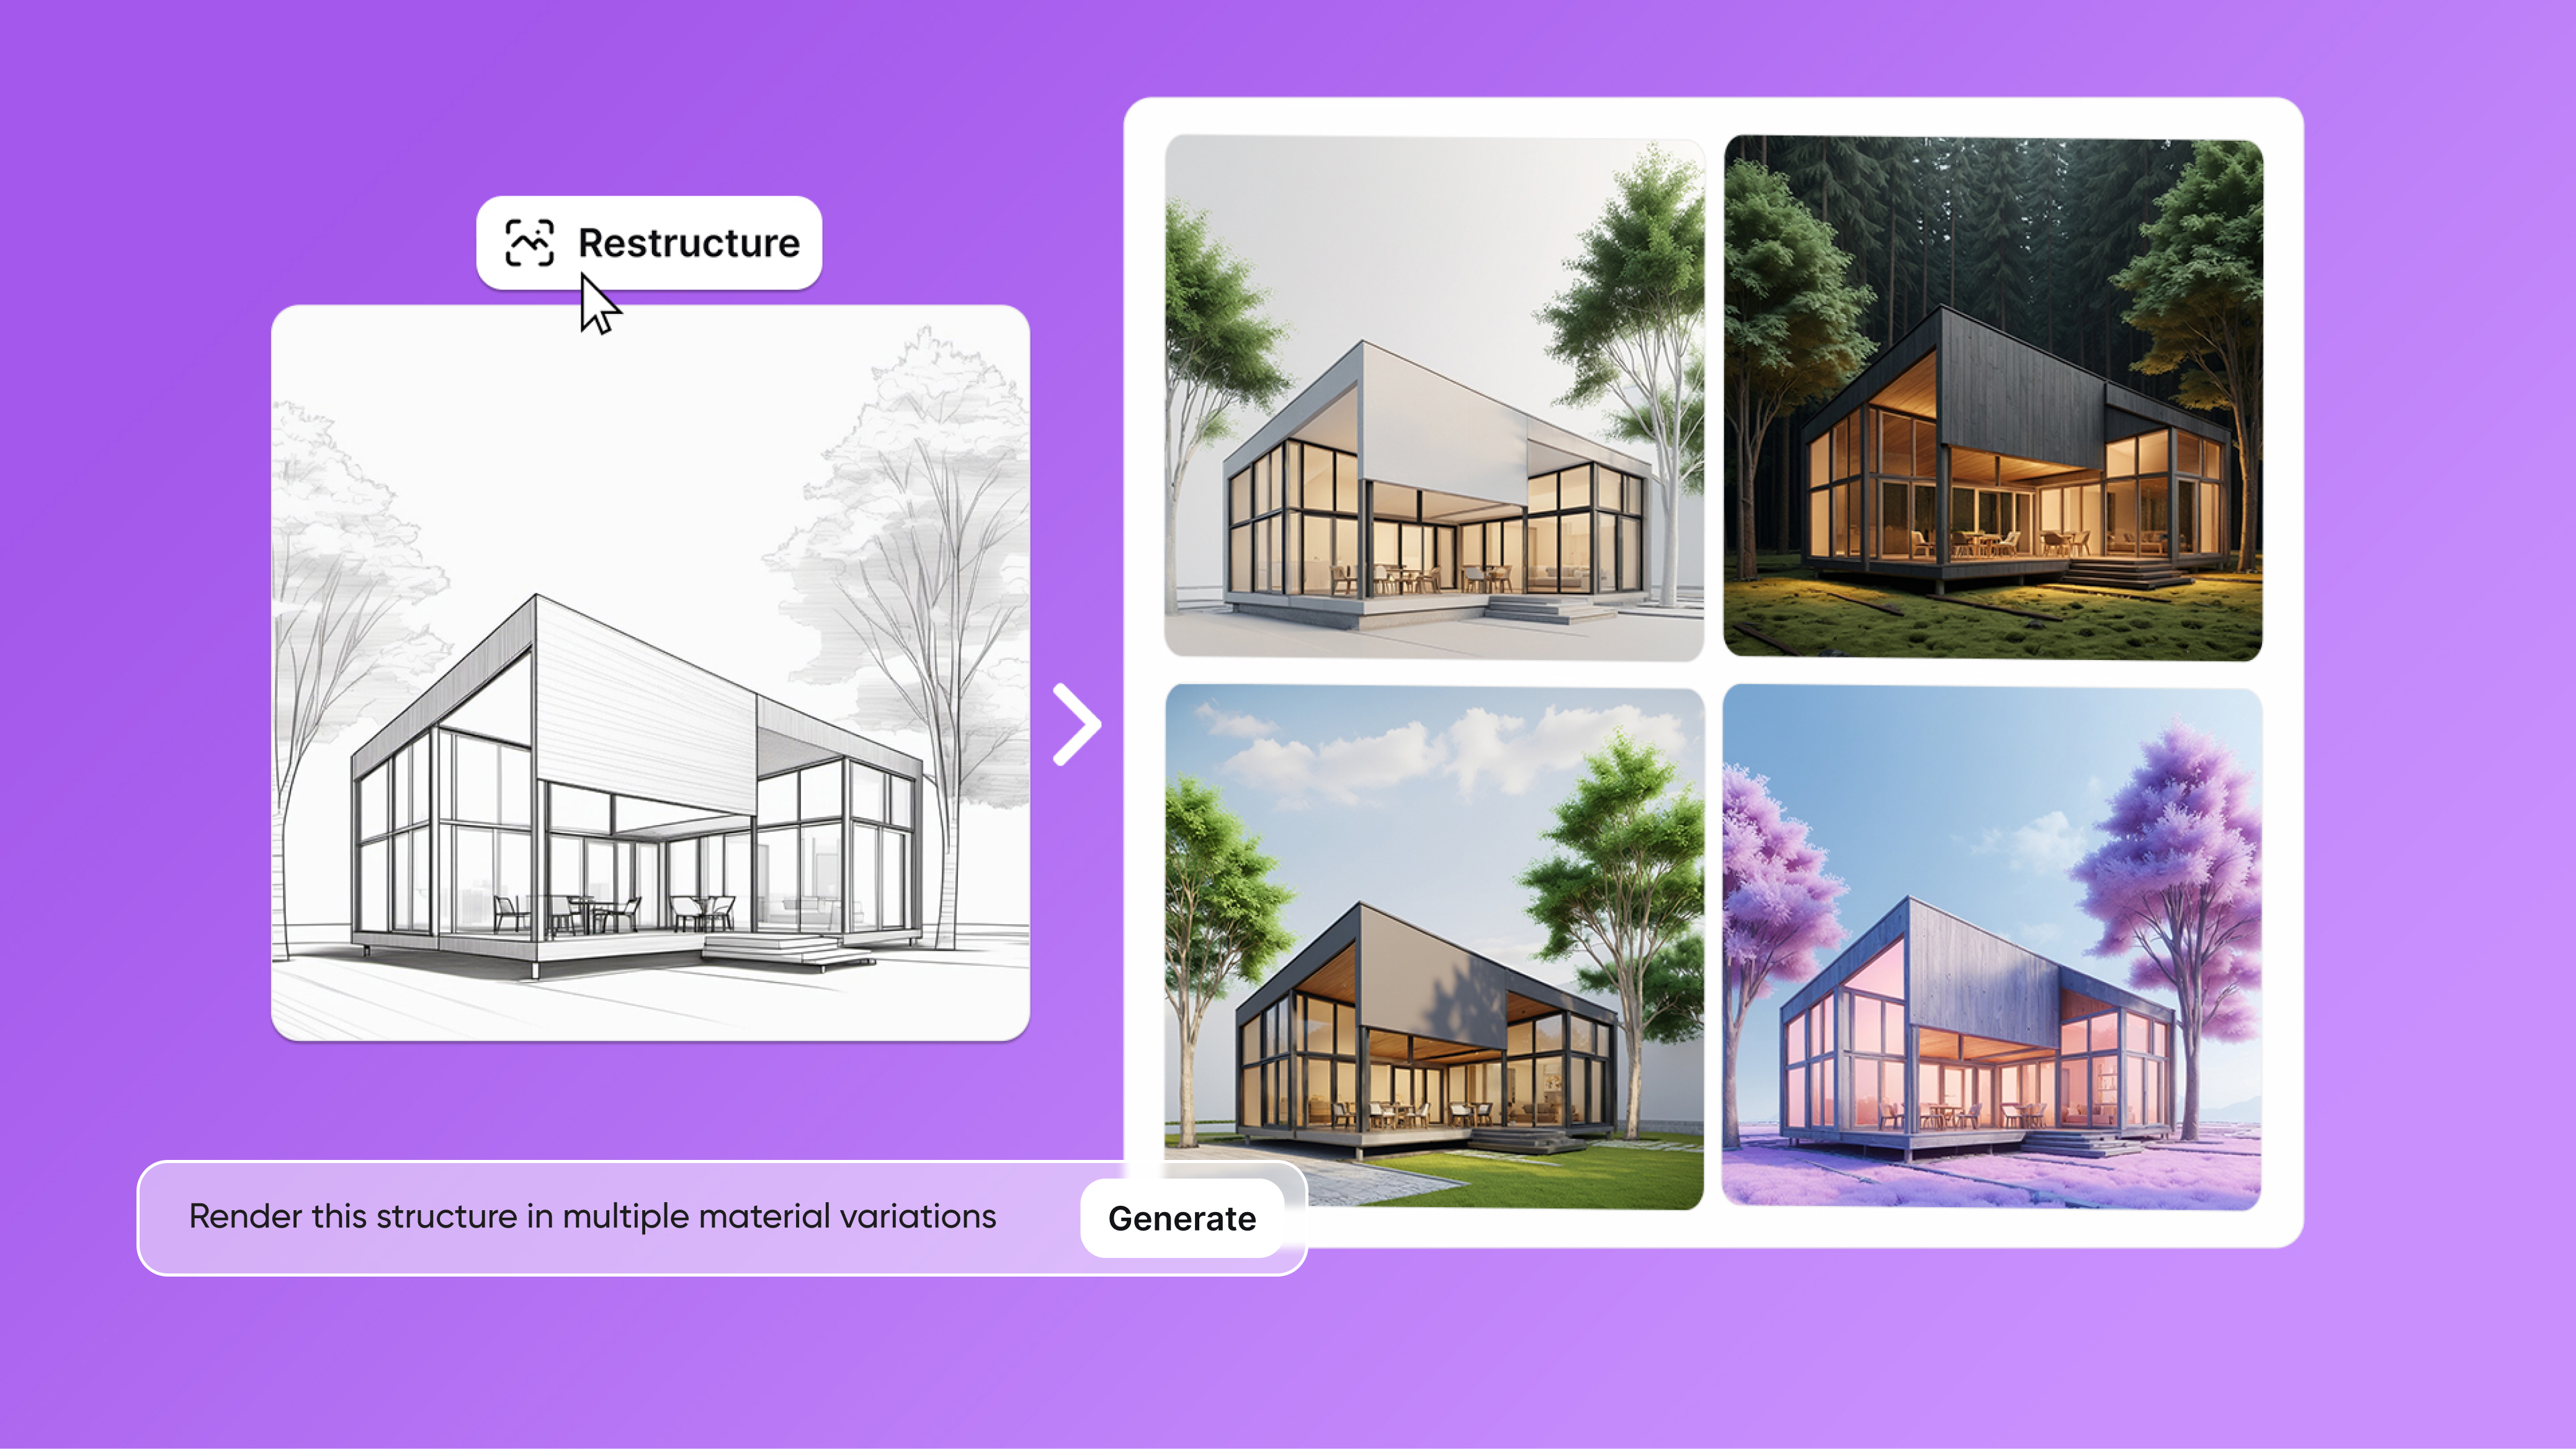
Step 4: Develop the Concept into a Photorealistic 3D Render
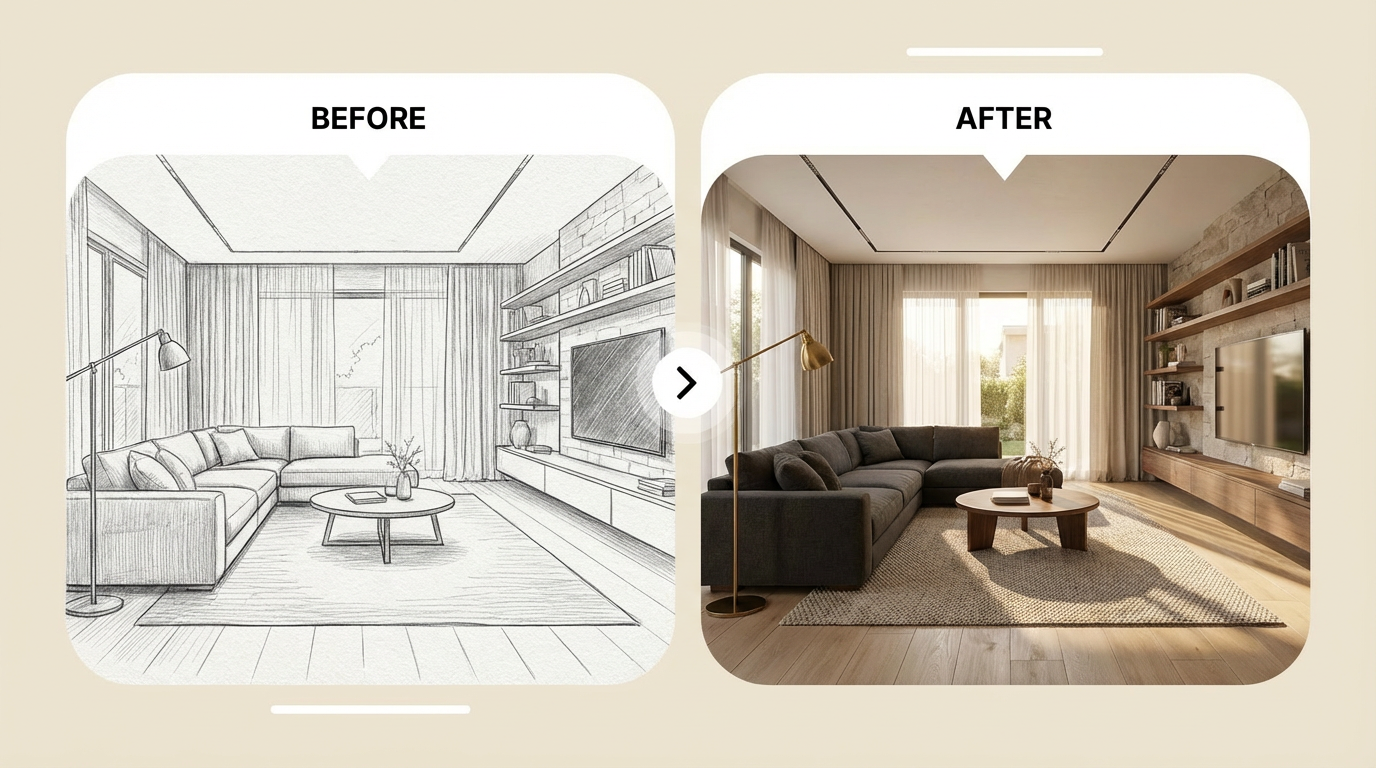
Once you have a confirmed design direction, take it further with ImagineArt AI Sketch to Render app — which converts hand-drawn sketches, floor plans, and CAD exports into photorealistic 3D renders without any 3D software.
This is where rough concepts become presentation-ready visuals. Sketch a rough floor plan, mark furniture positions, note window and door locations — then upload it alongside a detailed prompt describing materials and finishes.
How to do it:
- Upload your sketch, floor plan, or CAD export in any standard image format
- Write a prompt that specifies materials, finishes, lighting, and mood — "Polished concrete floors, floor-to-ceiling windows, warm afternoon light, mid-century oak furniture, sage green accent wall"
- Generate the render — the AI preserves your spatial layout while adding materials, lighting, and surface detail from your prompt
The render preserves your proportions and layout logic while showing exactly how the designed space will look in reality. For a full overview of architecture design apps that complement this workflow, see our dedicated guide.
Step 5: Refine Materials, Lighting, and Finishes
Run targeted iterations on the render by adjusting specific elements of the prompt — without changing the spatial layout.
Keep your floor plan or sketch as the fixed input and vary only the material and lighting description in the prompt. Test marble versus concrete for the flooring. Compare warm tungsten lighting against cool daylight. Switch the cabinetry from dark walnut to matte white.
Each variation tests a specific design decision on the actual layout of your space — the equivalent of ordering material samples, but in seconds and free. This stage typically surfaces the two or three genuine options worth presenting to a client or committing to in a real renovation. For reference on current material and aesthetic directions, our interior design trends guide covers what is leading in 2026.
Step 6: Generate a Video Walkthrough for Presentation
Turn your final render or redesigned room image into a cinematic walkthrough video using ImagineArt AI interior design video generator — upload the image, select a camera angle preset, and generate a professional-quality video in seconds.
Static renders are the standard. Video walkthroughs are the differentiator. Instead of showing a client a still image and asking them to imagine the space, you show them moving through it — which consistently produces faster decisions and stronger approval rates.
How to do it:
- Upload your final room image — the render from Step 5, the redesigned photo from Step 2, or any room photograph
- Select your camera movement — slow push-in, wide pan, corner sweep, or overhead reveal
- Generate and download the walkthrough video
For real estate professionals, research shows properties marketed with virtual staging video content sell 40% faster than those with static photography alone. For interior designers, the video eliminates the single most common barrier to client approval: the inability to imagine a static render as a lived-in space. For a complete look at AI tools for interior design across professional contexts, see our full guide.
Step 7: Export and Apply Your Design
Download your renders and video in full resolution and put them to work.
Renders from Steps 4 and 5 export at resolution suitable for client presentations, contractor briefs, planning applications, and print materials. The walkthrough video from Step 6 exports ready for direct upload to listing platforms, presentation decks, or social media.
For renovation projects: share the renders with contractors as a visual brief alongside technical drawings — it eliminates misinterpretation of the design intent. For real estate listings: upload the video walkthrough alongside standard photography. For client presentations: build a short deck with the before photo, the selected render, and the video walkthrough — three assets that communicate the full design in one sitting.
All outputs are available under ImagineArt's commercial use terms, covering client deliverables, property listings, and marketing materials.
Who Uses AI for Interior Design?
AI interior design tools serve four distinct audiences, and the right starting point depends on what you have and what you need.
Homeowners planning renovations use AI room redesign to visualize changes before committing. The average kitchen renovation costs $25,000–$50,000. Generating AI visualizations of different cabinet styles, countertop materials, and layout options from a smartphone photo before selecting any of them is the fastest way to avoid expensive decisions made from imagination alone. For a full guide on AI-driven home renovation visualization, see our dedicated article.
Interior designers and design professionals use AI to compress the pre-approval revision cycle from days to minutes. Upload a concept sketch, generate three photorealistic renders in different material treatments, present all three to a client in one meeting, and get direction before any detailed design work begins. Research shows project timelines reduce by approximately 20% when AI visualization is integrated into early-stage concept work.
Real estate agents and property professionals use AI room redesign for virtual staging of vacant properties and AI video walkthroughs for listings. For the workflows specific to commercial interior design projects, see our dedicated coverage.
Architects and design students primarily use the Sketch to Render workflow — converting concept sketches and CAD drawings into presentation-ready renders without specialist software. Portfolio renders, client pitches, and competition submissions are all viable outputs.
AI Interior Design Apps at a Glance
| App | Input | Output | Best For |
|---|---|---|---|
| AI Interior Design | Room photo + text prompt | Redesigned room render | Homeowners, renters, designers, real estate |
| Sketch to Render | Sketch / floor plan / CAD + text | Photorealistic 3D render | Designers, architects, students, developers |
| Interior Video Generator | Room image | Cinematic walkthrough video | Designers, real estate, developers |
Common Mistakes to Avoid
- Describing mood instead of specifics. "Cosy and warm" generates inconsistent results. "Warm amber lighting, natural linen textures, oak wood furniture, terracotta accents" generates a predictable, specific output. Name materials, colors, and lighting conditions explicitly.
- Using low-quality input photos. AI redesign quality is directly proportional to the clarity of the input photograph. A blurry or poorly lit room photo produces a poorly proportioned redesign. Use a well-lit, steady smartphone photo taken from a corner angle that shows the full room.
- Uploading a sketch without describing materials. The Sketch to Render app preserves your spatial layout but needs material and finish information from the prompt. A sketch of a kitchen with no material description will generate a kitchen — but not necessarily with your intended materials. Include flooring, wall treatment, cabinetry material, and lighting in every sketch prompt.
- Stopping at the first generation. The first output is a direction-finder, not a finished deliverable. Generate 3–5 variants by adjusting one element at a time — change the color palette, swap the furniture style, adjust the lighting description. Iteration consistently produces better results than a single pass.
- Ignoring the video output for presentations. Static renders are the default; video walkthroughs are the differentiator. Generating a 30-second walkthrough video takes seconds and produces substantially more client engagement than the same space shown as a still image.
Ready to Create AI Interior Design with ImagineArt?
ImagineArt is the only platform that brings together AI room photo redesign, sketch-to-3D-render conversion, and video walkthrough generation in one free-tier tool — covering the full interior design visualization workflow for homeowners, designers, and real estate professionals.
Frequently Asked Questions
Upload a room photo to ImagineArt's AI Interior Design app, describe the style you want in a text prompt, and generate a redesigned version of your space in seconds. For sketch-based workflows, use the Sketch to Render app — upload your drawing and describe the materials and style. For video walkthroughs, use the Interior Design Video Generator with any room image as input. All three apps are free to start with 100 daily credits.
Yes. ImagineArt's free tier includes 100 daily credits covering all three interior design apps — room redesign, sketch-to-render, and video generation — with no credit card required. Paid plans offer higher resolution outputs, increased generation limits, and priority processing for professional workflows.
Modern AI interior design tools produce proportionally accurate results — furniture scale, spatial relationships, and lighting behavior are consistent with the actual room dimensions in the uploaded photo. Material rendering accuracy (fabric texture, wood grain, metal finish) has improved significantly and is suitable for client presentations and pre-renovation planning, though not for technical construction documentation.
Yes. ImagineArt's Sketch to Render app accepts hand-drawn sketches, floor plans, CAD exports, and digital line drawings and converts them into photorealistic 3D renders in seconds. The AI preserves the spatial layout and proportions of your original sketch while adding materials, lighting, and surface detail based on your text prompt.
Yes. ImagineArt's Interior Design Video Generator takes any room image and produces a cinematic walkthrough video with professional camera angle presets. This is useful for client presentations, real estate listings, and property marketing where a static render is insufficient.
No. All three ImagineArt interior design apps are built for non-designers. The input is a photograph or drawing and a text description — no design software, 3D modelling knowledge, or technical training required. Professional designers and architects use the same tools for client presentation and concept development at a more advanced level.
Professional interior designers typically charge $2,000–$5,000 per room for concept development and visualization. AI tools start free. AI is highly effective for visualization, iteration, and client communication — it does not replace the spatial planning expertise, trade relationships, and project management that professional designers provide for full renovation projects. For visualization and concept exploration specifically, AI is faster and substantially cheaper.
AI interior design tools support the full range of styles — Scandinavian minimalism, Japandi, Mid-Century Modern, Industrial, Brutalist, Art Deco, Maximalist, Bohemian, Coastal, Biophilic, and more. Name the style explicitly in your prompt for the most consistent results.
Tooba Siddiqui
Tooba Siddiqui is a content marketer with a strong focus on AI trends and product innovation. She explores generative AI with a keen eye. At ImagineArt, she develops marketing content that translates cutting-edge innovation into engaging, search-driven narratives for the right audience.