Zahida Misher
October 29, 2026 • Updated October 30, 2026
18 mins Read
Almost every good edit is the same seven moves, done in a different app. Learning how to edit photos is mostly learning the order: crop before you fix the light, fix the light before you touch color, clean up before you style. Swap the order and you end up fixing your fixes.
This guide gives you that order, then runs it three ways: in the Photos app already on your phone, in a desktop editor like Photoshop or Windows Photos, and with a typed instruction in an AI photo editor.
The last section is an index: every common job, from scratched prints to product shots, has its own guide, so this page stays a map, not a phone book.
What does editing a photo actually involve?
Editing a photo means fixing composition, light and color first, then cleaning up distractions and adding style, then exporting the file for wherever it will live. Every editor, from a phone's built-in app to Photoshop to a prompt box, does some version of those jobs. The order matters because each step changes what the next one sees.
Photographer Rick McEvoy's editing order is a good sanity check. He starts by being picky about which photos deserve an edit at all, crops for composition, corrects technical problems, makes global adjustments, then local ones, and removes unwanted items only "when it is ok to". His last rule is the one most people skip: don't spend forever on one picture.
Adobe's own Photoshop walkthrough opens the same way, with straightening and cropping, and it duplicates the image so you work on layers instead of the original. That idea, keep an untouched copy, is the first thing photo editing for beginners should teach and the last thing anyone remembers.
Here's why the order earns its place. Crop late and you've brightened a corner you then throw away. Grade color before you fix exposure and the grade shifts as soon as you lift the shadows. Remove a bin before you crop and you might have cropped it out for free. None of this needs talent, just a sequence.
The 7-step order: how to edit photos in any editor
The seven steps below work in any app. Each one names the tool to reach for on a phone, on a computer and in a prompt, and ends with the guide that goes deeper.
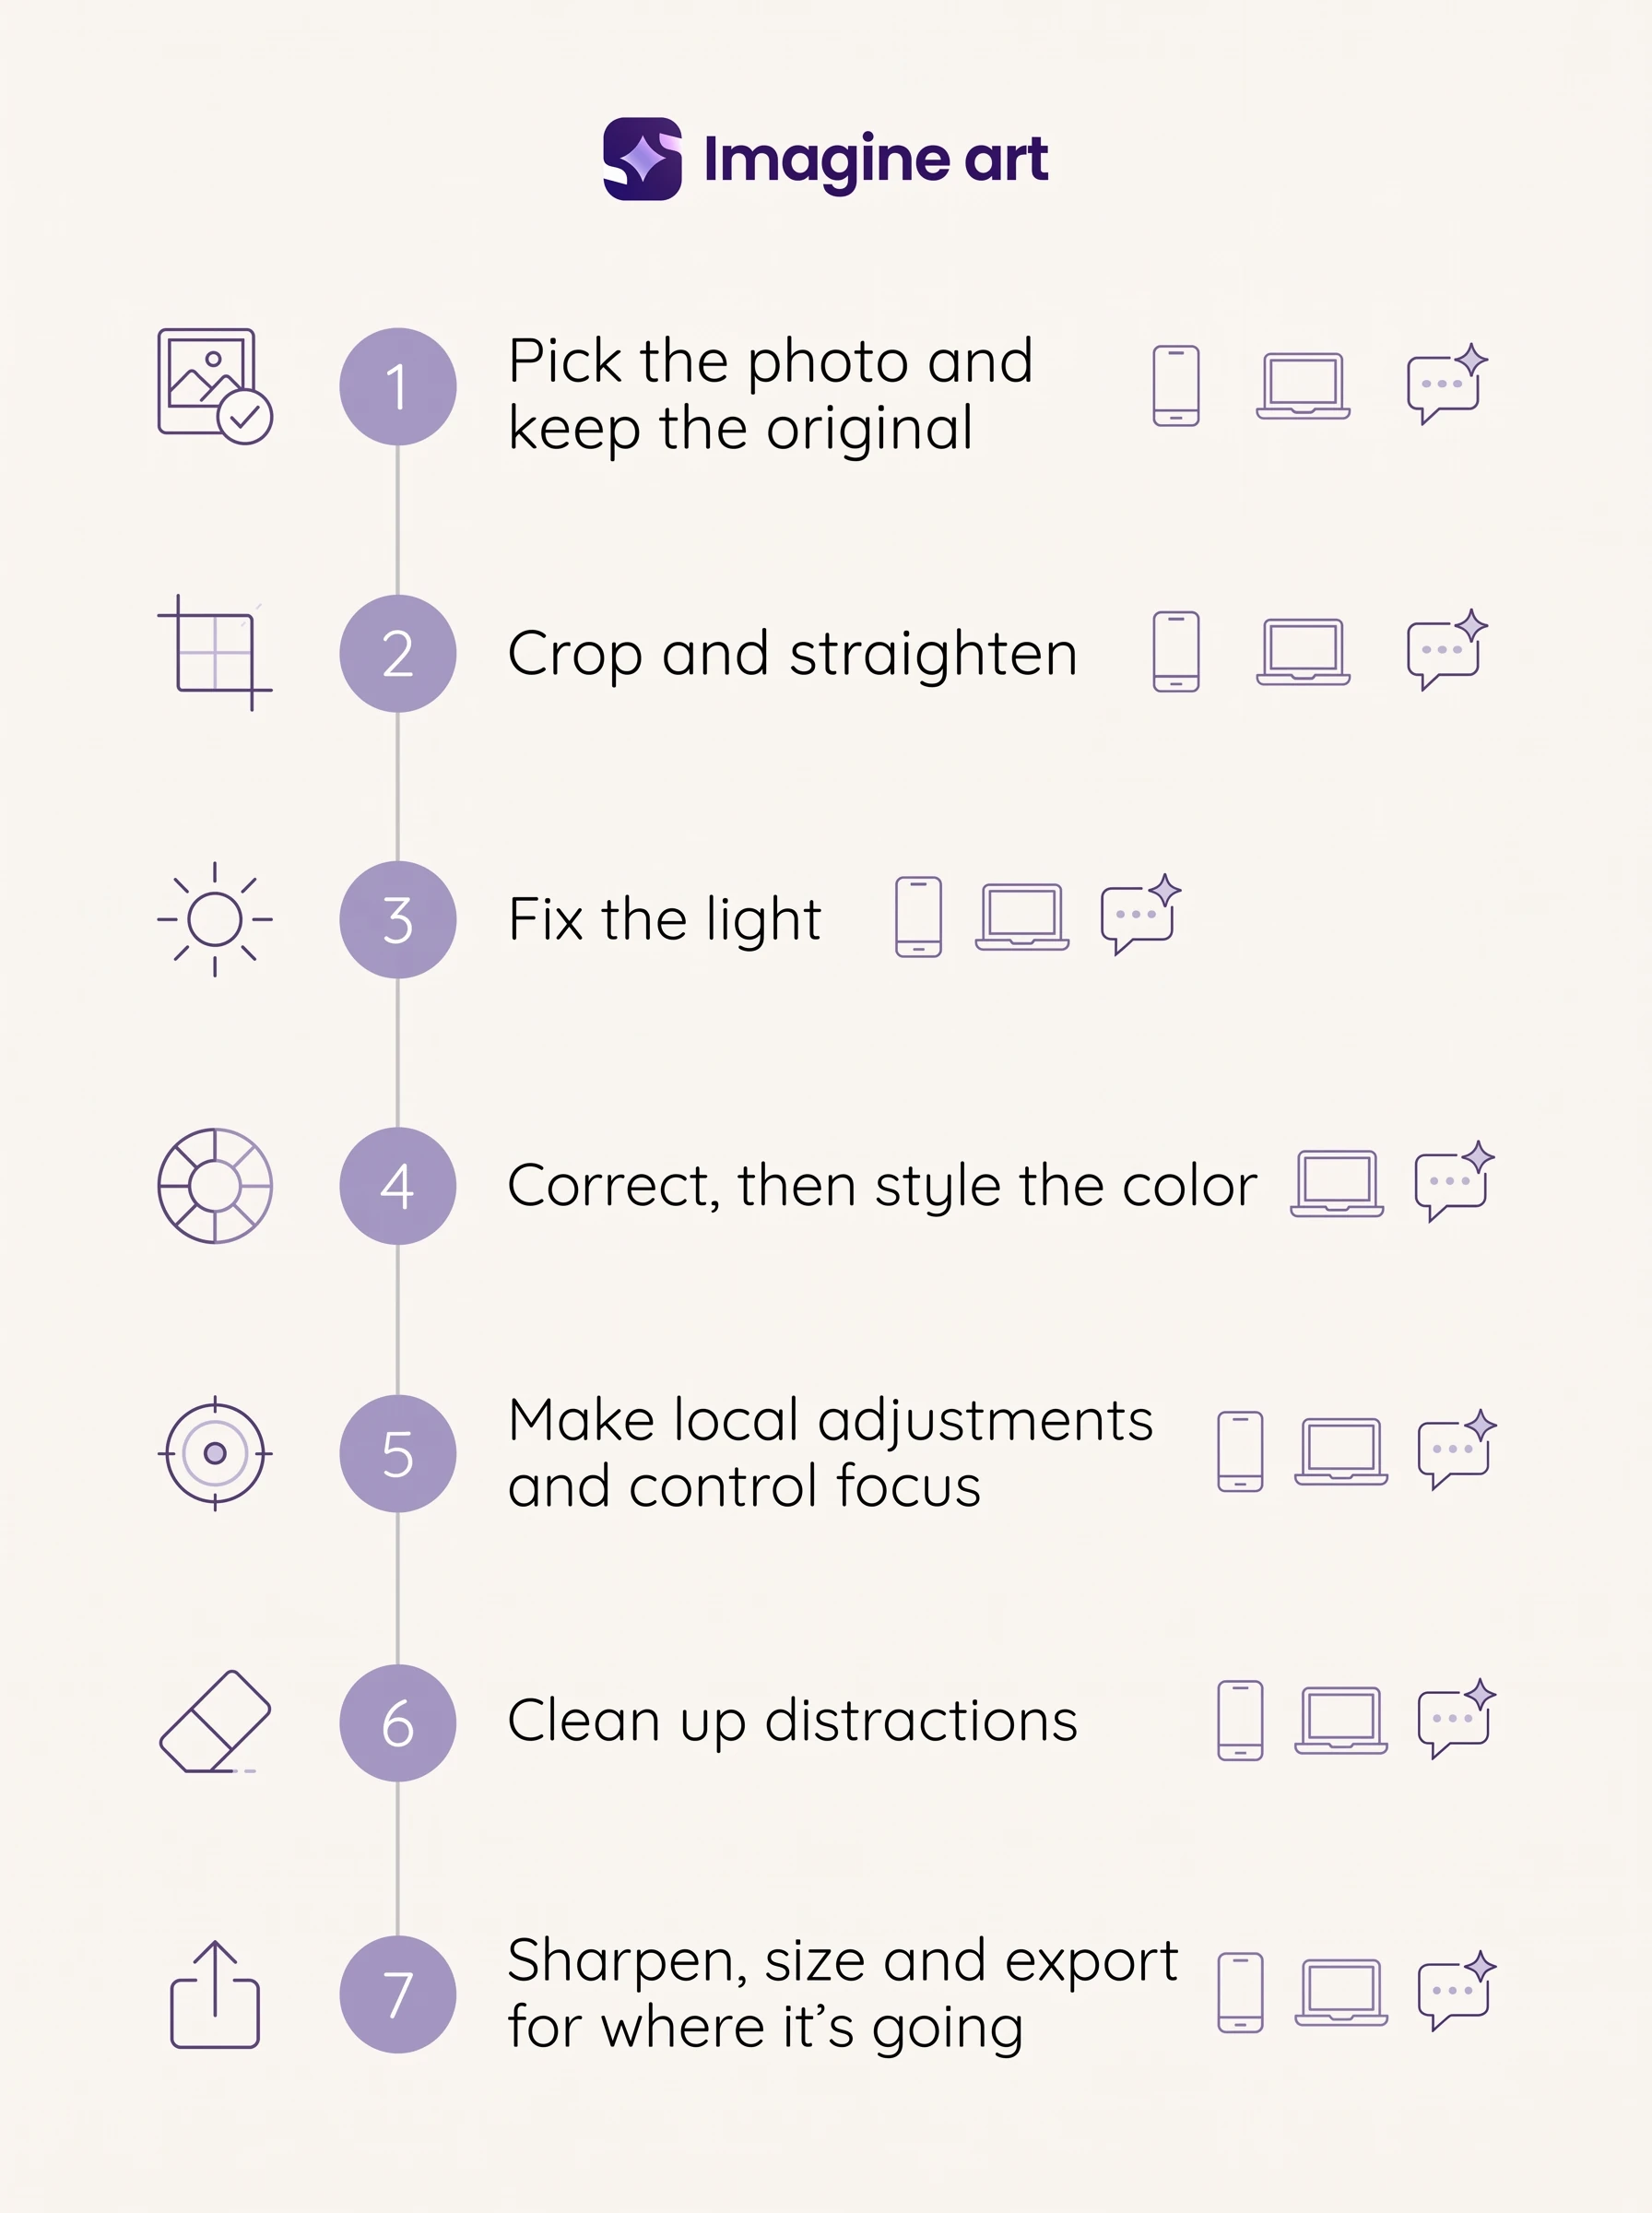 Seven-step photo editing order with the matching phone, desktop and AI prompt tool for each step
1. Pick the photo and keep the original
Choose the frame that's closest to right before you edit anything. Sharpness, expression and timing can't be added later without inventing them. Then protect the original. In Photoshop, Adobe's guide duplicates the image and works on layers, which keeps every change reversible. Phone and Windows editors keep a way back too. Microsoft's Photos app has a Reset button that cancels all edits. Treat "can I undo this" as a requirement, not a nice extra. If your editor only saves over the file, export a copy first.
2. Crop and straighten
Fix the frame next, because everything after this step only touches what stays in it. Photoshop has a Straighten tool, and Adobe suggests keeping "Delete Cropped Pixels" off so you can re-adjust the crop later. Windows Photos offers preset ratios plus rotate and flip. Crop for where the photo is going. Instagram's help page says it keeps a photo at its original resolution when it's 320 to 1080 pixels wide with a ratio between 1.91:1 and 3:4, so a portrait 4:5 crop sits inside that range. Our guide on how to edit photos for Instagram covers ratios and a consistent feed look.
3. Fix the light
Now set exposure. On iPhone, Apple's Adjust panel lets you swipe through Exposure, Brilliance and Highlights. Instagram's editor has a Lux control. Pull highlights down before you push exposure up, or bright skies go white and stay white. Blown-out areas are the hard case. Once a window or sky is pure white, there's often no detail left, and an AI editor may draw some in. Our guide to fix overexposed photos shows what that looks like. For a mood change rather than a rescue, you can also relight a photo.
4. Correct, then style the color
Color has two jobs, and they happen in order. Correction makes whites white and skin look like skin. Styling adds a mood on top: warm, faded, teal shadows, whatever the photo is for. Instagram's editor and Google Photos' Adjust panel both have a Warmth control for the first job. Style before you correct and you're decorating a color cast. If your whites still look orange, no filter will save the skin tones. The difference is covered properly in color grading vs color correction, with three versions of one photo.
5. Make local adjustments and control focus
Global sliders hit the whole frame. Local adjustments hit one part: brighten a face, darken a sky, soften a background. Windows Photos has a Background option that can blur, remove or replace the background. Google Photos has Portrait light, which relights a face after the shot. Background blur is the local edit people ask about most, and it's harder than it looks around hair and glasses. Our guide to blur the background of a photo covers portrait mode, desktop tools and the busy backgrounds where prompts struggled.
6. Clean up distractions
Remove what pulls the eye: a bin, a stray cable, a stranger. Photoshop gives you three tools, per Adobe: Spot Healing Brush for small fixes, Healing Brush for more control and Clone Stamp to copy a clean area over. Windows has Generative Erase. iPhone has Clean Up with Apple Intelligence, and Google Photos has Magic Eraser. Removing or adding a person needs their OK first (more on consent below). For the how-to, see remove someone from a picture. If your phone lacks the built-in eraser, here are Magic Eraser alternatives. ImagineArt also has an AI object remover for this single job.
7. Sharpen, size and export for where it's going
Finish for the destination. Instagram's help page says photos wider than 1080 pixels get sized down to 1080 wide, so a giant export buys you nothing there.
Finishing touches belong here, not earlier. Lightroom Classic's Effects panel, per Adobe's help, has a post-crop vignette (negative Amount darkens the corners) and Grain with Amount, Size and Roughness. Use them last so cropping doesn't move the vignette. If the file is too small for its job, upscale a small image before export rather than stretching it.
How do you edit photos on your phone?
Open the photo in your phone's own Photos app, tap Edit, and work through crop, the Adjust sliders and filters before you download anything else. Both iPhone and Google Photos now include AI clean-up tools, though each one has device, account or region limits worth checking first.
On iPhone
Apple's iPhone editing guide lays the tools out in this order:
-
Pick the shot in the Photos app and tap Edit.
-
Try the Enhance button first. Apple says it auto-adjusts light and color, which is a useful starting point you can then tweak.
-
Open Adjust and swipe through the sliders: Exposure, Brilliance, Highlights and the rest. Step 3 of the order lives here.
-
Add a filter such as Vivid or Dramatic and set its intensity. On iPhone 16 and later, Photographic Styles take the place of filters.
-
Use Clean Up to remove a distraction. Apple says it "can help remove distracting objects".
-
Tap Done. You can revert later.
Two extras save real time. Copy Edits and Paste Edits apply one photo's settings to a batch, and Apple says Photos automatically adjusts the white balance and exposure of the pasted photos so they match. And Clean Up needs Apple Intelligence: check the Clean Up requirements, because it isn't on every model, and devices bought in mainland China don't get it.
On Android phones
Google Photos editing help lists a deeper toolkit than most people find:
-
Open the photo and tap Edit.
-
Try Enhance, Dynamic or AI Enhance for a one-tap start.
-
Crop. Auto frame, per Google, "uses AI to fill in parts of a picture or expand" it.
-
Open Adjust for Brightness, Contrast, Saturation, Warmth, HDR effect and Portrait light.
-
Use Actions for Magic Eraser, Unblur and Best Take.
-
Try to describe an edit in words, by text or voice.
The honest limit is eligibility. Google says most editing features need 3 GB of RAM and Android 8.0 or later, some are Pixel-only, and Ask requires you to be 18 or older with a personal Google Account in a supported region. If Unblur grays out, our guide to unblur an image covers what sharpening can and can't recover.
When the built-in app runs out, compare the best photo editing apps for iPhone and Android before paying for one.
How to edit photos on a computer
A computer gets you layers, precise selections and a bigger screen for checking edges. Here's how to edit pictures on the three desktop routes most people already have or are weighing up.
Photoshop, step by step
Adobe's Photoshop editing guide starts with four steps, then covers adjustments and removal tools:
-
Open the image.
-
Straighten with the Straighten tool.
-
Crop, with "Delete Cropped Pixels" off so the crop stays editable.
-
Duplicate the image and work in layers, so nothing touches the original.
-
Make light and color adjustments.
-
Remove problems with Spot Healing Brush, Healing Brush or Clone Stamp.
Then export a copy sized for its destination, as in step 7 of the order above.
The same page lists Photoshop's Single App plan at US$22.99 a month on an annual plan, billed monthly, as of October 2026.
Photoshop also has Generative Fill. Per Adobe's help, you make a selection, choose Generative Fill and type a prompt, or leave it blank to fill from the surrounding pixels. The result lands on a new layer, and generations use Adobe's generative credits. Our explainer on how Generative Fill works covers the details and free options.
Lightroom for presets and batches
Lightroom is the better pick when you have dozens of photos from one shoot, not one photo that needs surgery. Adobe's help explains how to copy and paste edit settings in Lightroom Classic and batch-apply them to many frames through the Copy Settings dialog.
That's how a wedding set ends up with one consistent look. Edit one hero frame, paste its settings across the set, then fix the few that drift. Which app to learn first is the whole question in Lightroom vs Photoshop.
Free tools already on Windows
Windows users have a decent editor already. Microsoft's Photos app guide covers the controls: press Ctrl+E to edit, then Crop (preset ratios, rotate, flip), Adjustment sliders, 15 filters, Markup, Generative Erase and Background (blur, remove or replace). Press and hold, or tap the spacebar, to compare with the original.
Microsoft is refreshingly frank about Generative Erase: it "uses AI to infill the removed area and may not be perfect". It also runs locally on your device, which is handy for private photos.
Need more than that without a subscription? Start with these Photoshop alternatives.
If design templates matter as much as photo fixes, look at Canva alternatives instead.
Adobe's own AI tools have their own credit system. Before you sign up for one, check is Adobe Firefly free for what the free tier covers.
How do you edit a photo with an AI prompt?
Upload the photo, type the one change you want, say what must stay the same, then generate and compare the result with the original. If it's close but not right, refine the prompt and run it again. You skip sliders and selections, and you trade some precision for speed.
ImagineArt's editor page sums up the trade in one line: "There are no masks to draw, layers to manage or selection tools to learn." That's the appeal, and also the limit. When the prompt is vague, there's no brush to fall back on.
Step by step in ImagineArt
Here's how to edit a photo in the browser when you edit with a prompt in ImagineArt:
-
Upload your photo as a JPG, PNG or WEBP file, 30MB at most. The editor page notes that a sharp, well-lit image gives better results. RAW files aren't accepted, so export a JPG from your camera app first.
-
Name the change first: "Remove the trash can on the right."
-
Say what must stay: "Keep everything else unchanged" or "keep her face and pose unchanged".
-
Add light, mood or one specific detail if it matters.
-
Generate. ImagineArt's page describes results as "ready in seconds".
-
Compare with your original. If something drifts, refine the prompt and run it again.
-
Download.
The editor runs in a browser on Mac, Windows, Android and iPhone, so there's nothing to install. The page's own prompt advice is one change per prompt, then stack edits. Our first test below shows why that advice exists.
Our three edits: before and after
We ran three edits in ImagineArt on Nano Banana Pro, each on a generated, fictional source photo. Prompts are printed exactly as we typed them. One barely moved the photo. Two worked.
Edit 1: light and color (three fixes in one prompt). The source is a café table by a window: a cappuccino, a croissant and an open notebook, dim and orange, with the window blown out to white.
 Dark, orange-tinted café table photo with a blown-out window
Brighten the exposure, recover detail in the bright window and remove the orange colour cast so the whites look neutral. Keep the table, objects, framing and composition exactly the same.
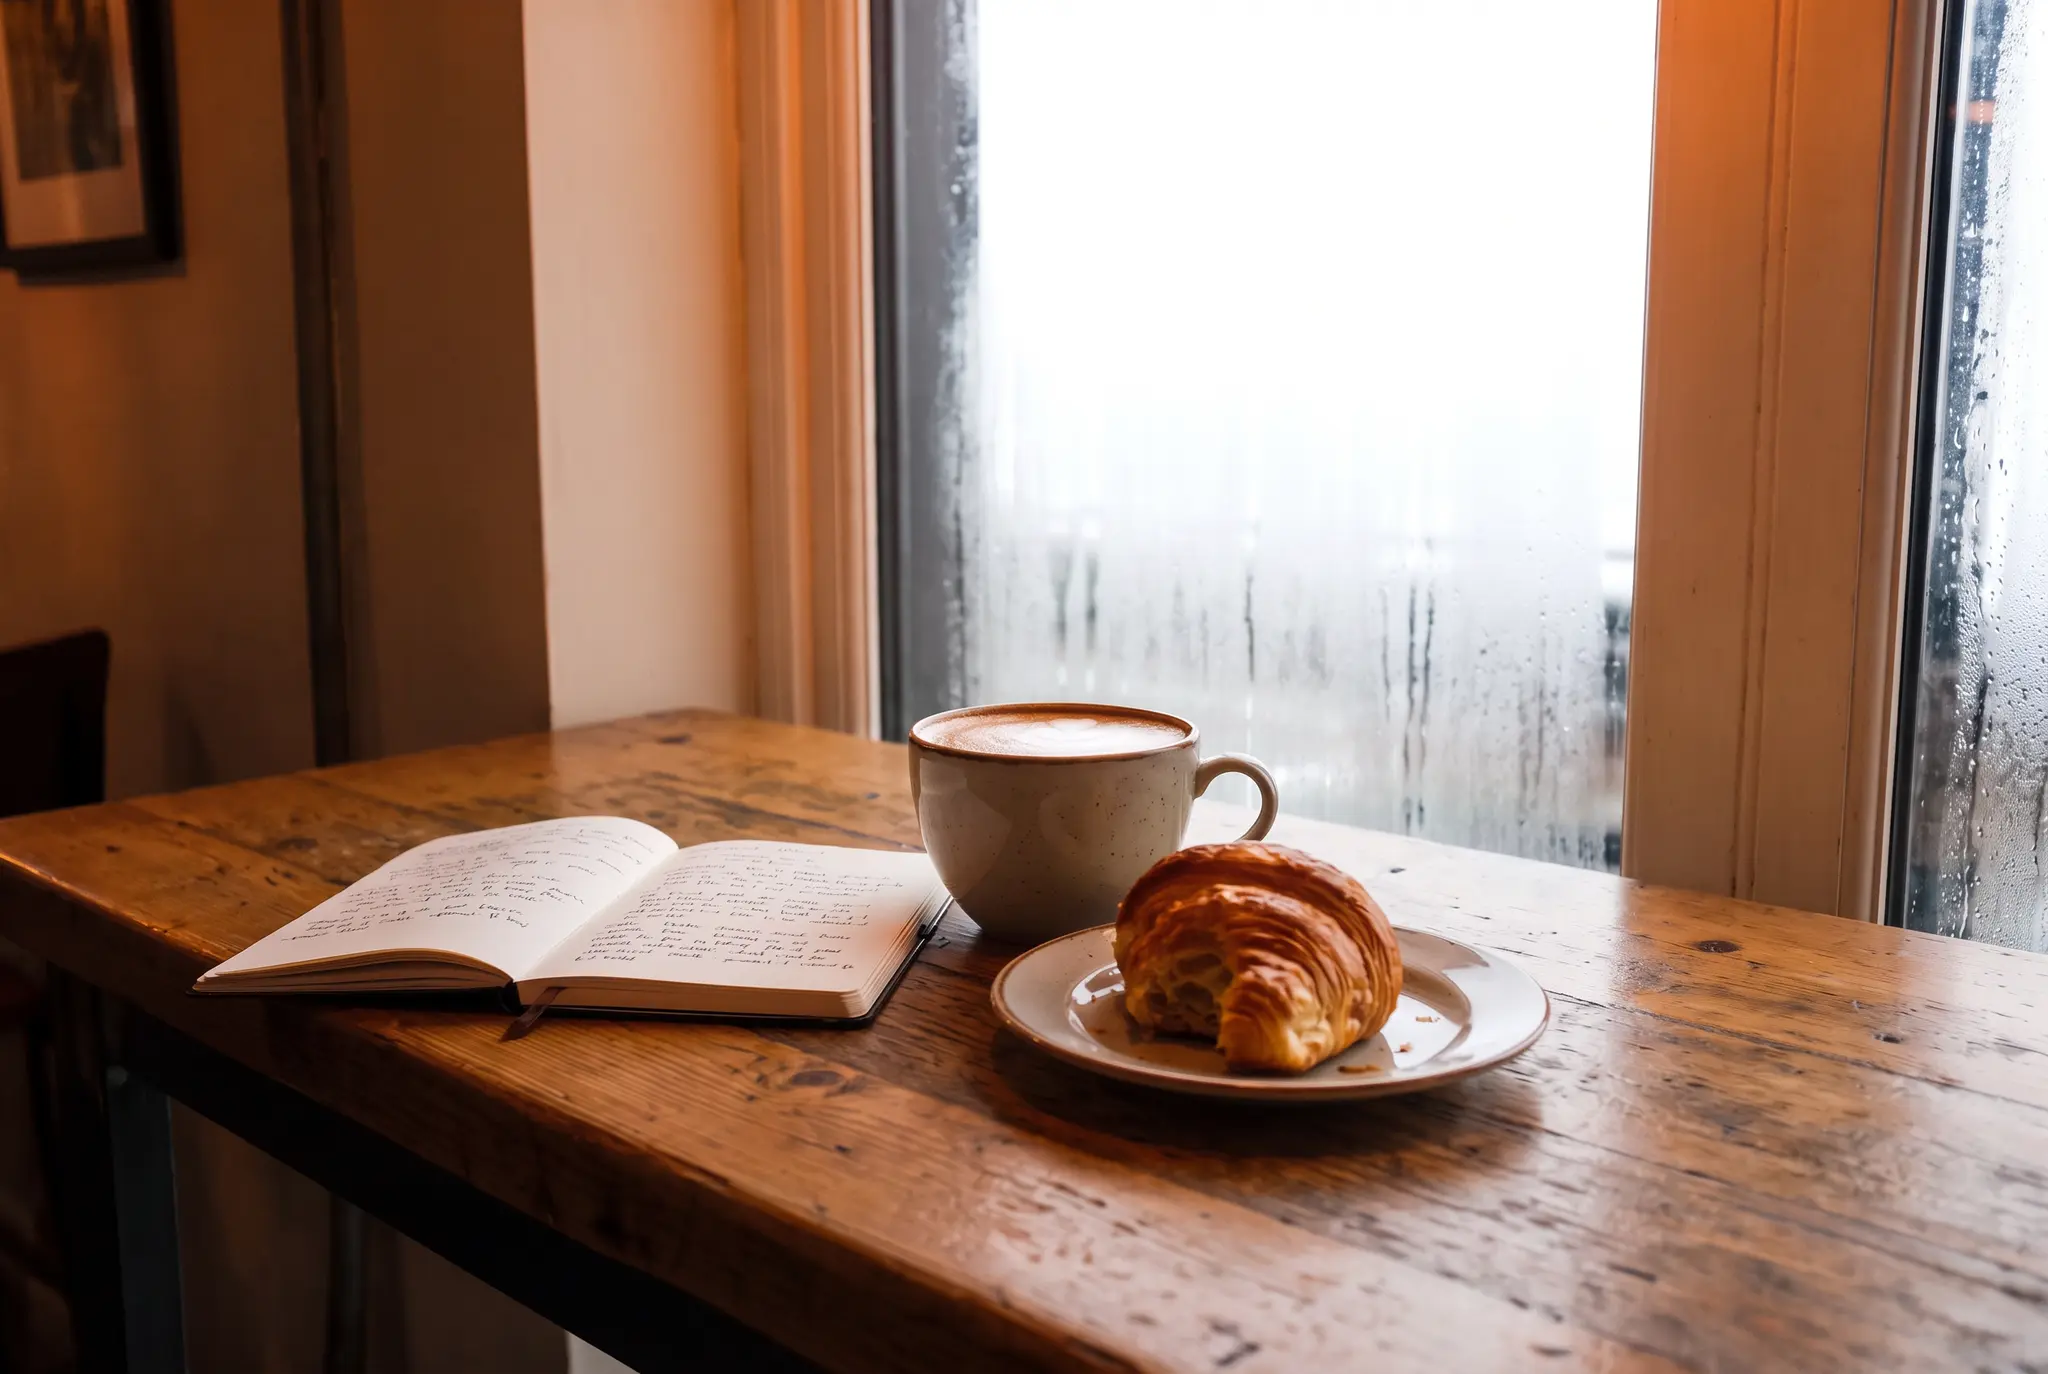 The same café table photo, only slightly brighter, still orange-tinted with a white window
The verdict: barely changed. The photo came back a little brighter (average RGB went from 141/112/95 to 149/120/105, measured on the files), but the orange cast was still there and the window was still blown white. The table, cup, croissant and framing held, so the "keep" half of the prompt worked. The three-fixes-at-once half didn't.
That's the honest lesson for the one-change-per-prompt rule. A prompt that asks for exposure, highlight recovery and white balance at once gives the model three jobs and no priority. So we split it. Same café photo, three single-change prompts in a row: remove the orange cast, brighten by about one stop, then tone down the window.
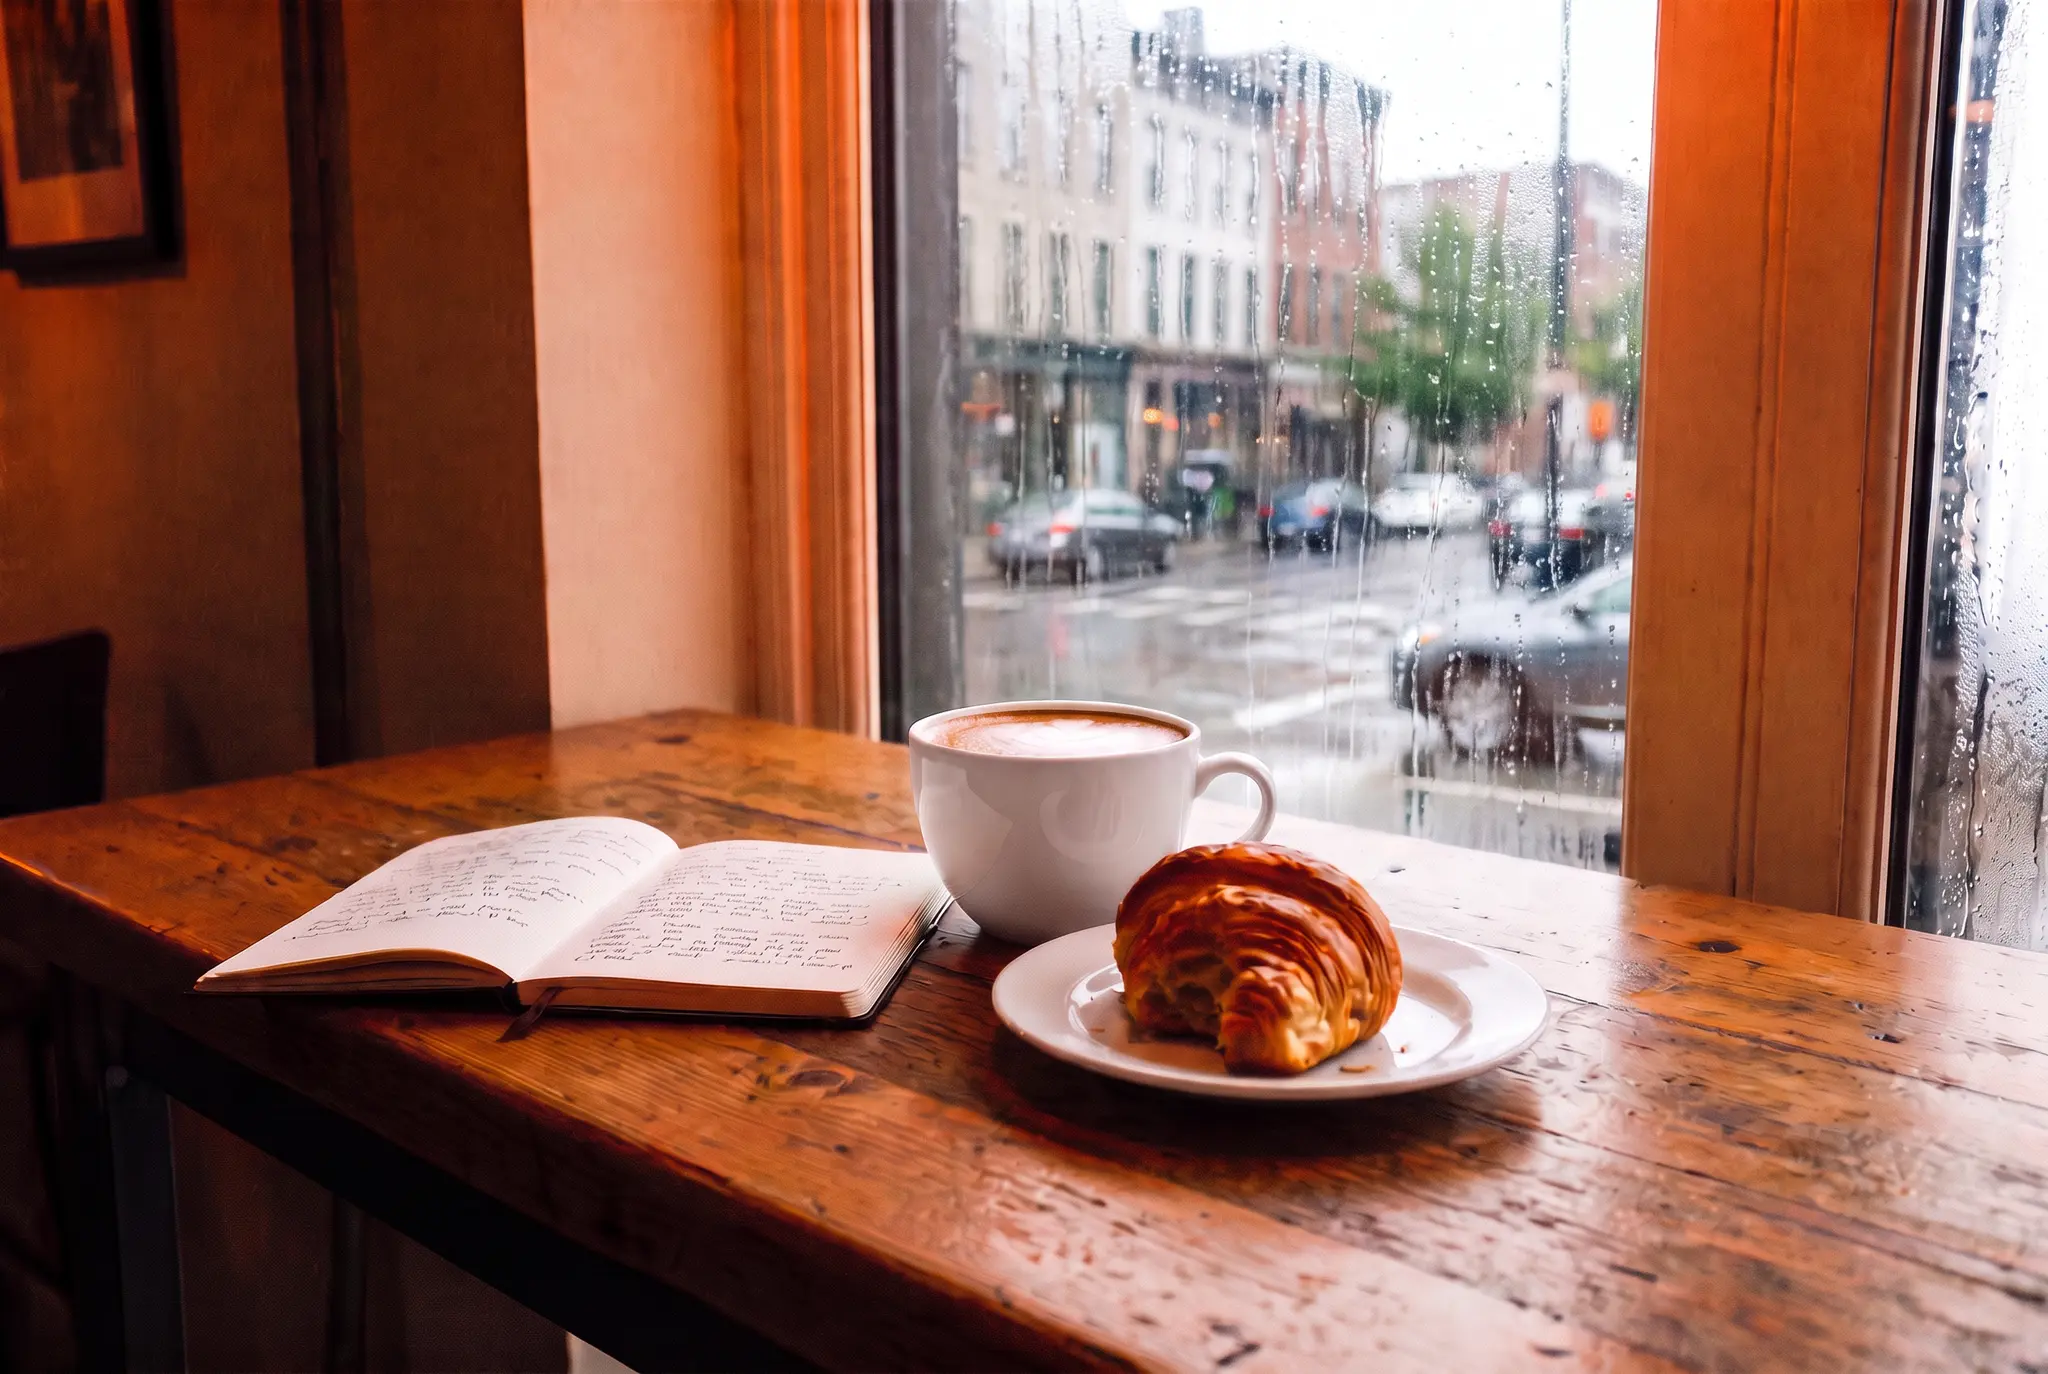 The café table photo after three single-change prompts, with a street view now visible through the window and the room still warm-tinted
Splitting helped for one change only. The cast prompt barely moved the color (still orange), and "one stop brighter" came back far less than a stop. The window prompt worked: a rainy street with buildings and parked cars now shows through the glass. That view was invented, though, since the source window was pure white.
So one change per prompt is necessary, not sufficient. A prompt editor treats the window as content it can redraw, and treats a global color or exposure tweak as something to mostly leave alone. Those global moves are what sliders do better. Our fix overexposed photos guide hit the same invented-view effect on a different room.
Edit 2: remove distractions. The source is a wide midday beach with a lone walker in a gray hoodie far off on the left and a plastic trash can near the right edge.
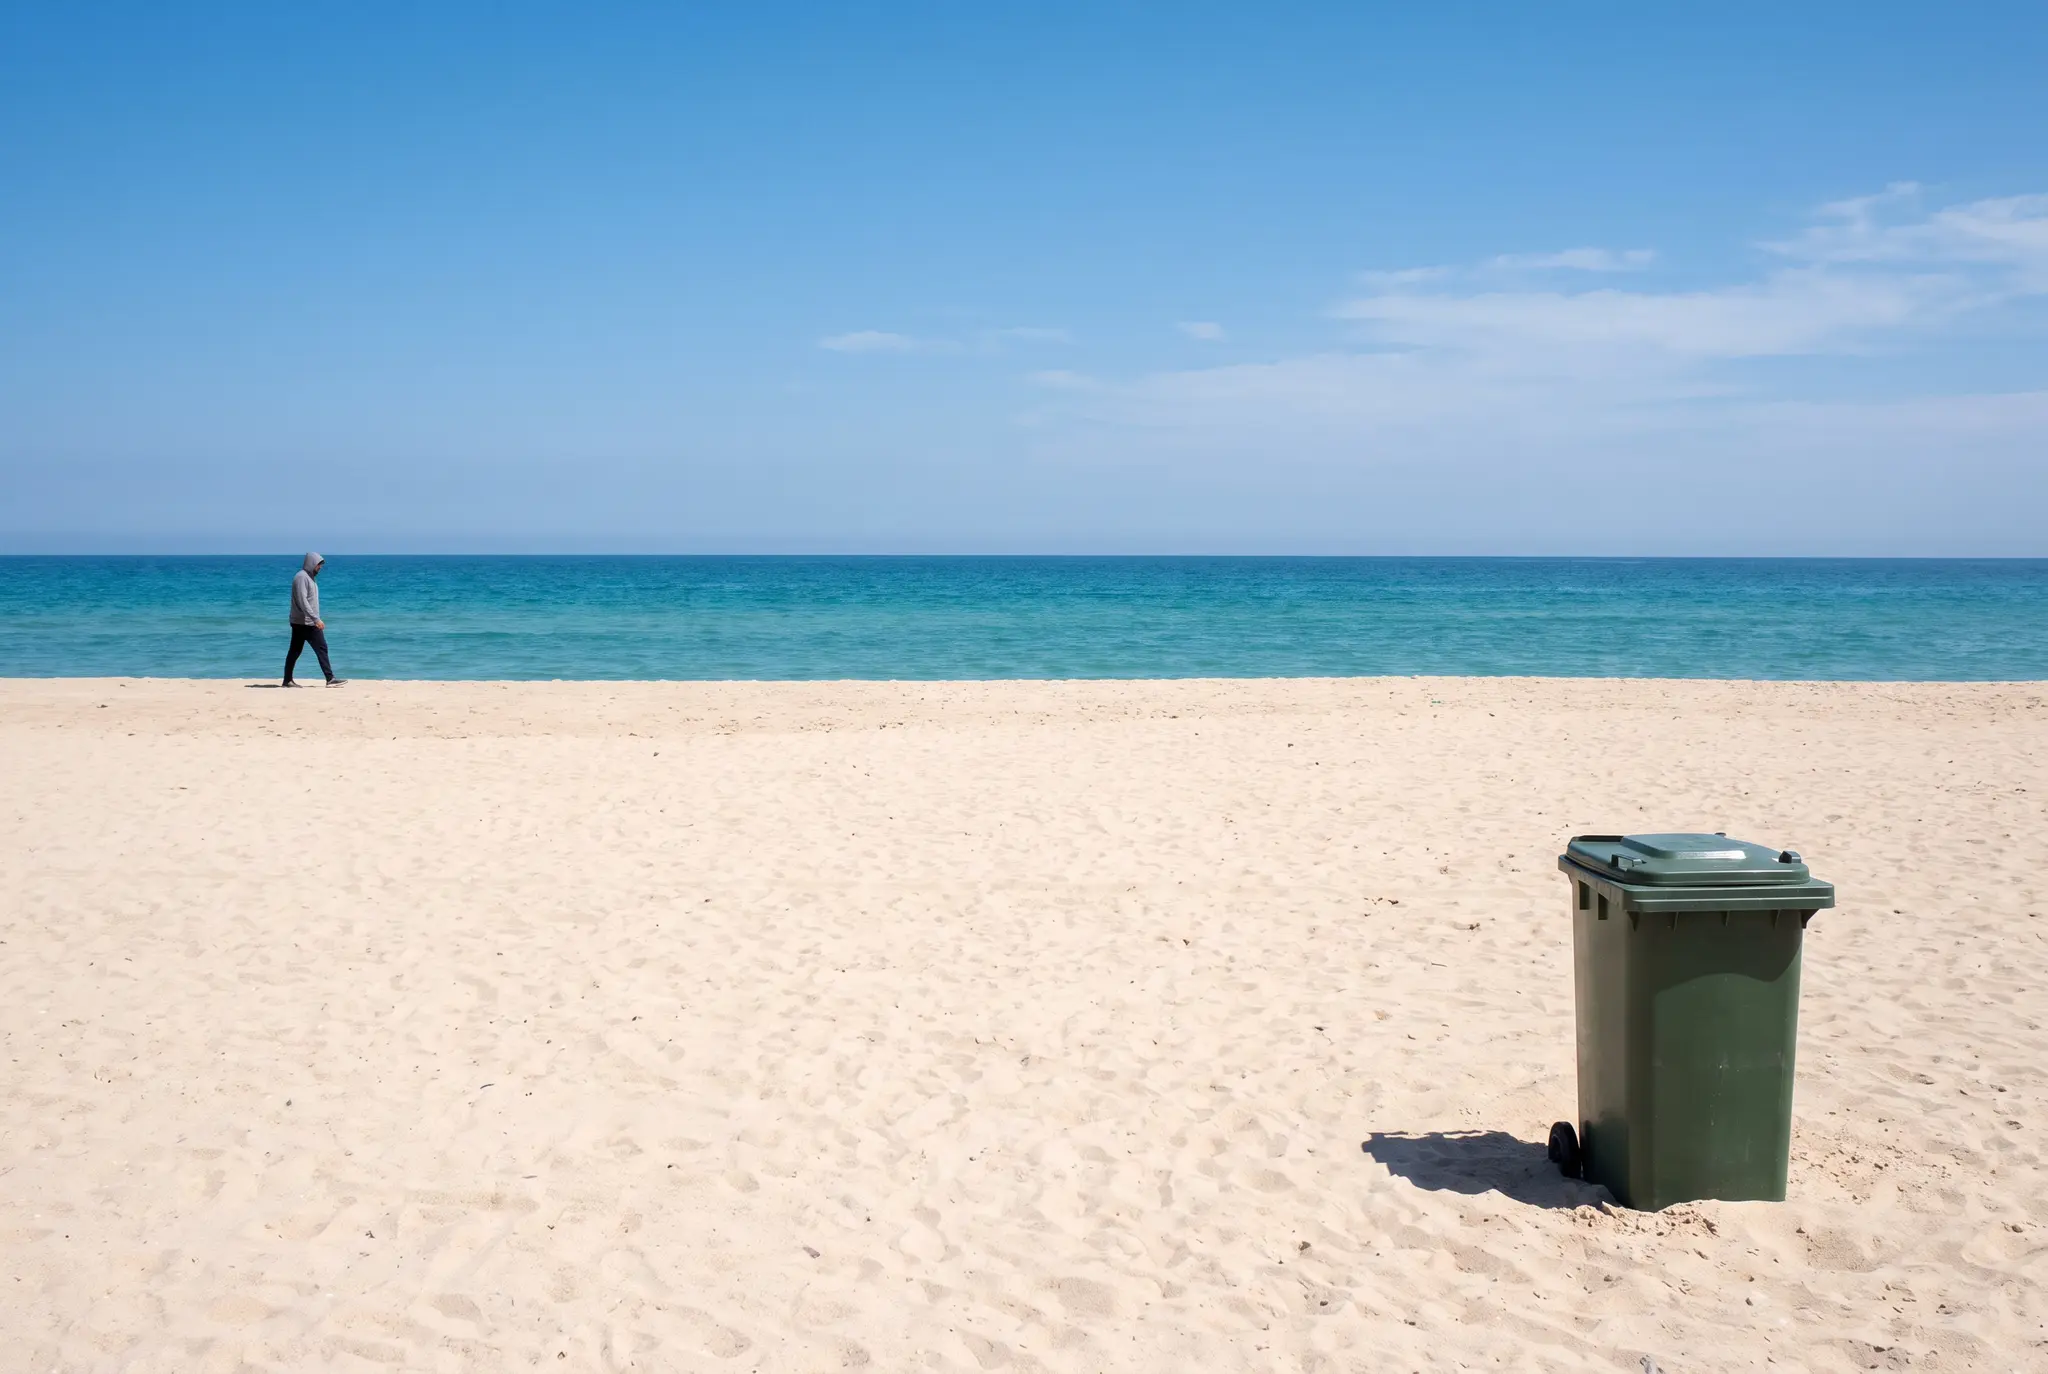 Beach photo with a distant walker and a trash can
Remove the person walking in the background and the trash can on the right. Fill both areas with matching sand and sea. Keep everything else unchanged.
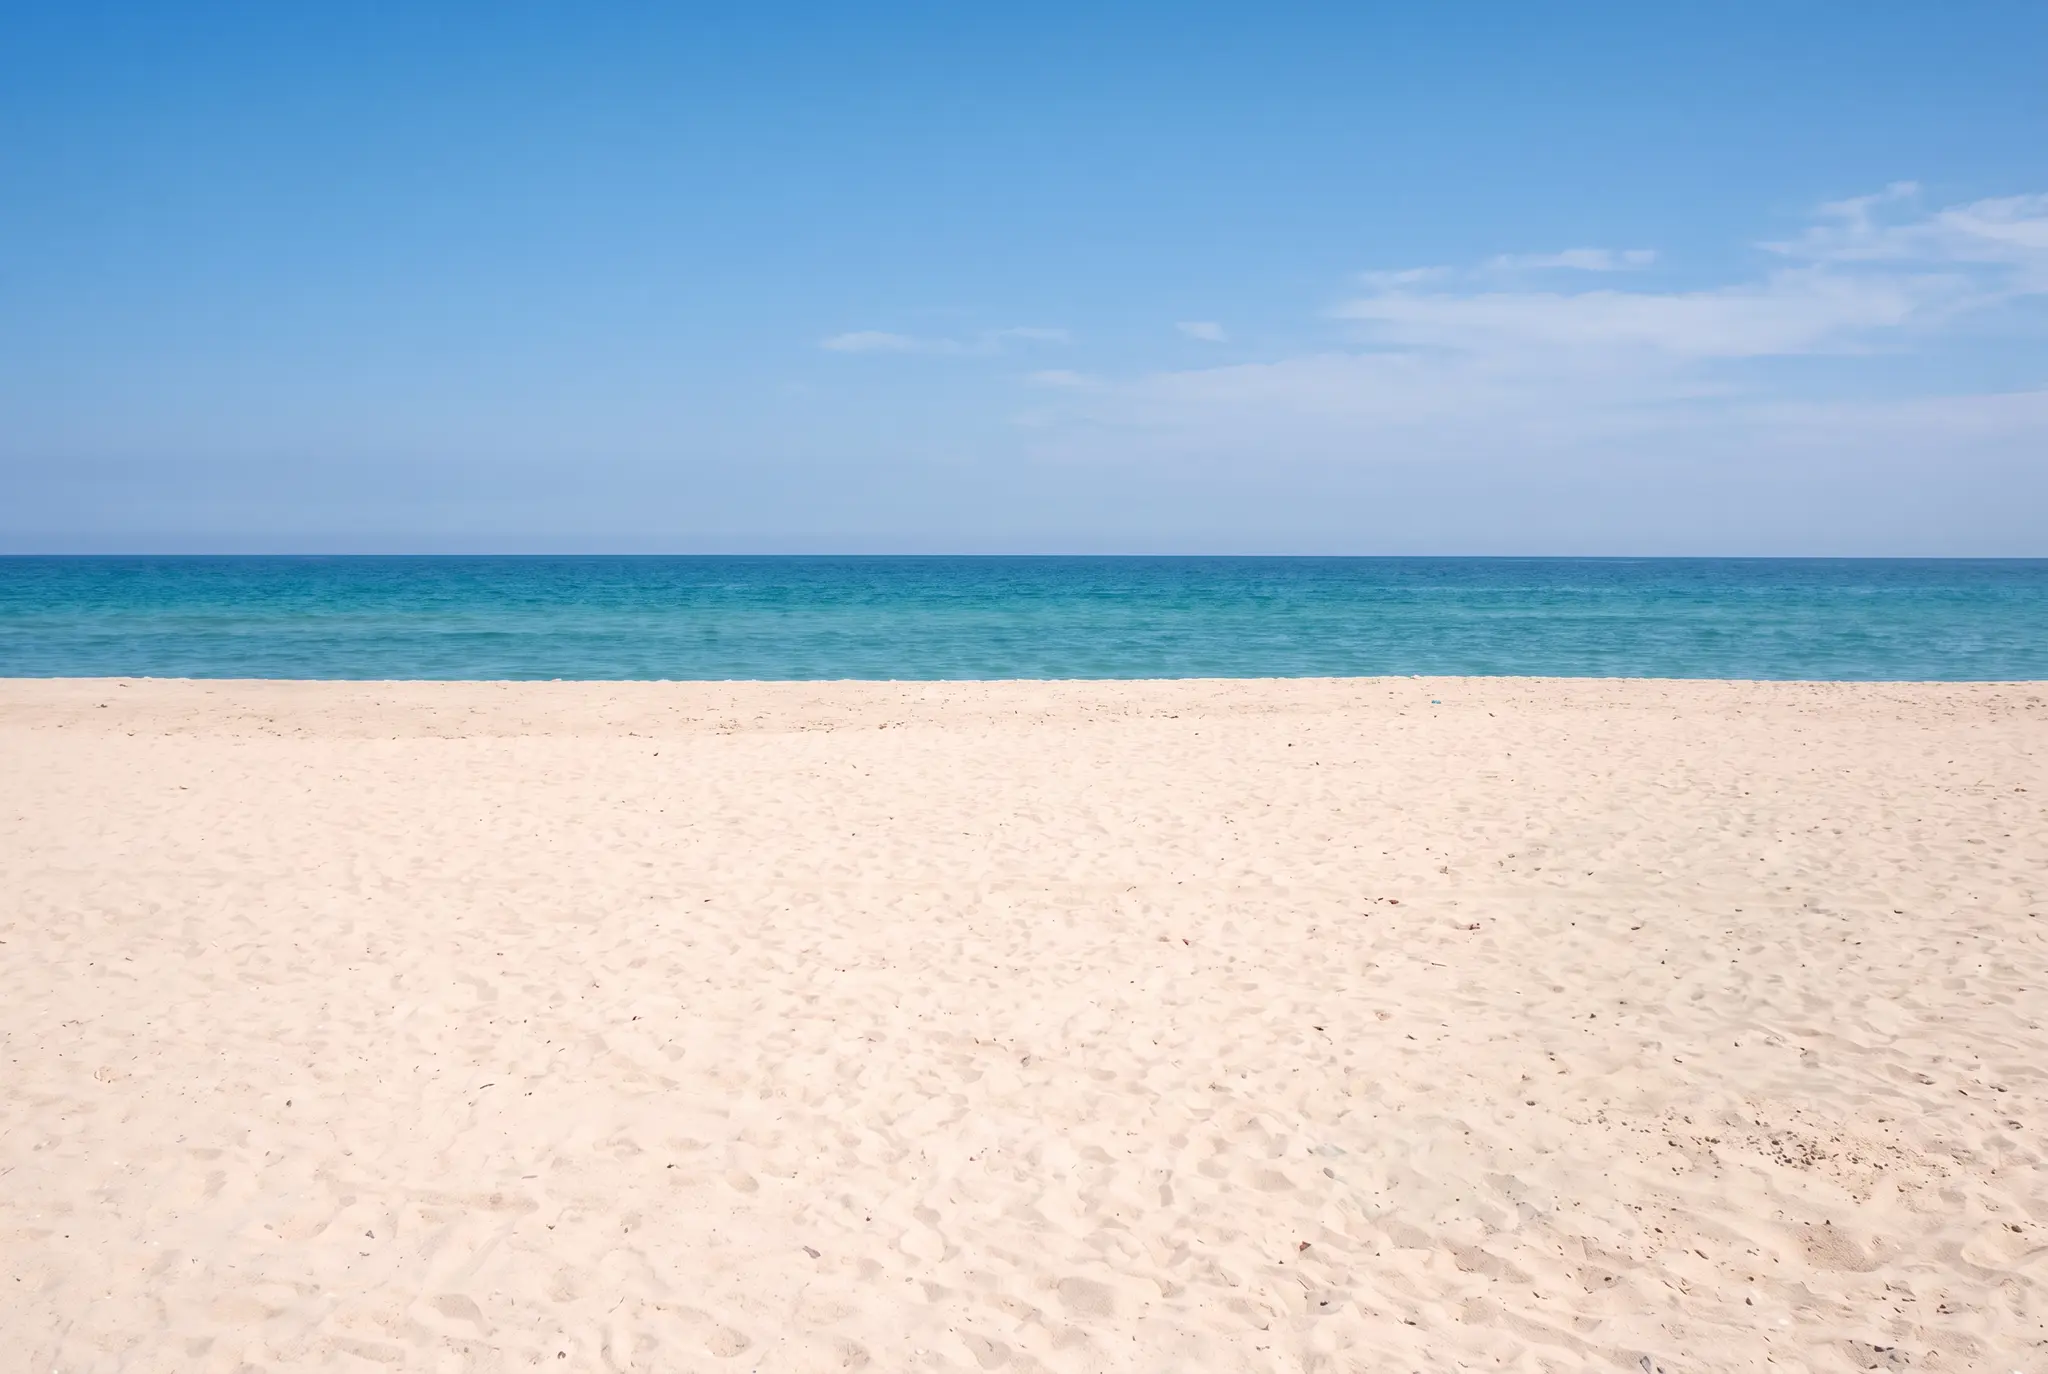 The same beach photo with the walker and trash can removed
Clean. The walker and the can are gone, the sand and sea run continuously, and there's no visible patch. It even removed the can's shadow, a detail that's easy to miss when you clone by hand. Sand and sea are forgiving backgrounds, though. Busy scenes are harder, and the remove-someone guide linked in step 6 shows one word in a prompt adding an object nobody asked for.
Edit 3: sky and light, subject kept. The source is a fictional woman in her thirties in a mustard coat on a city rooftop, water towers behind her, under a flat gray sky.
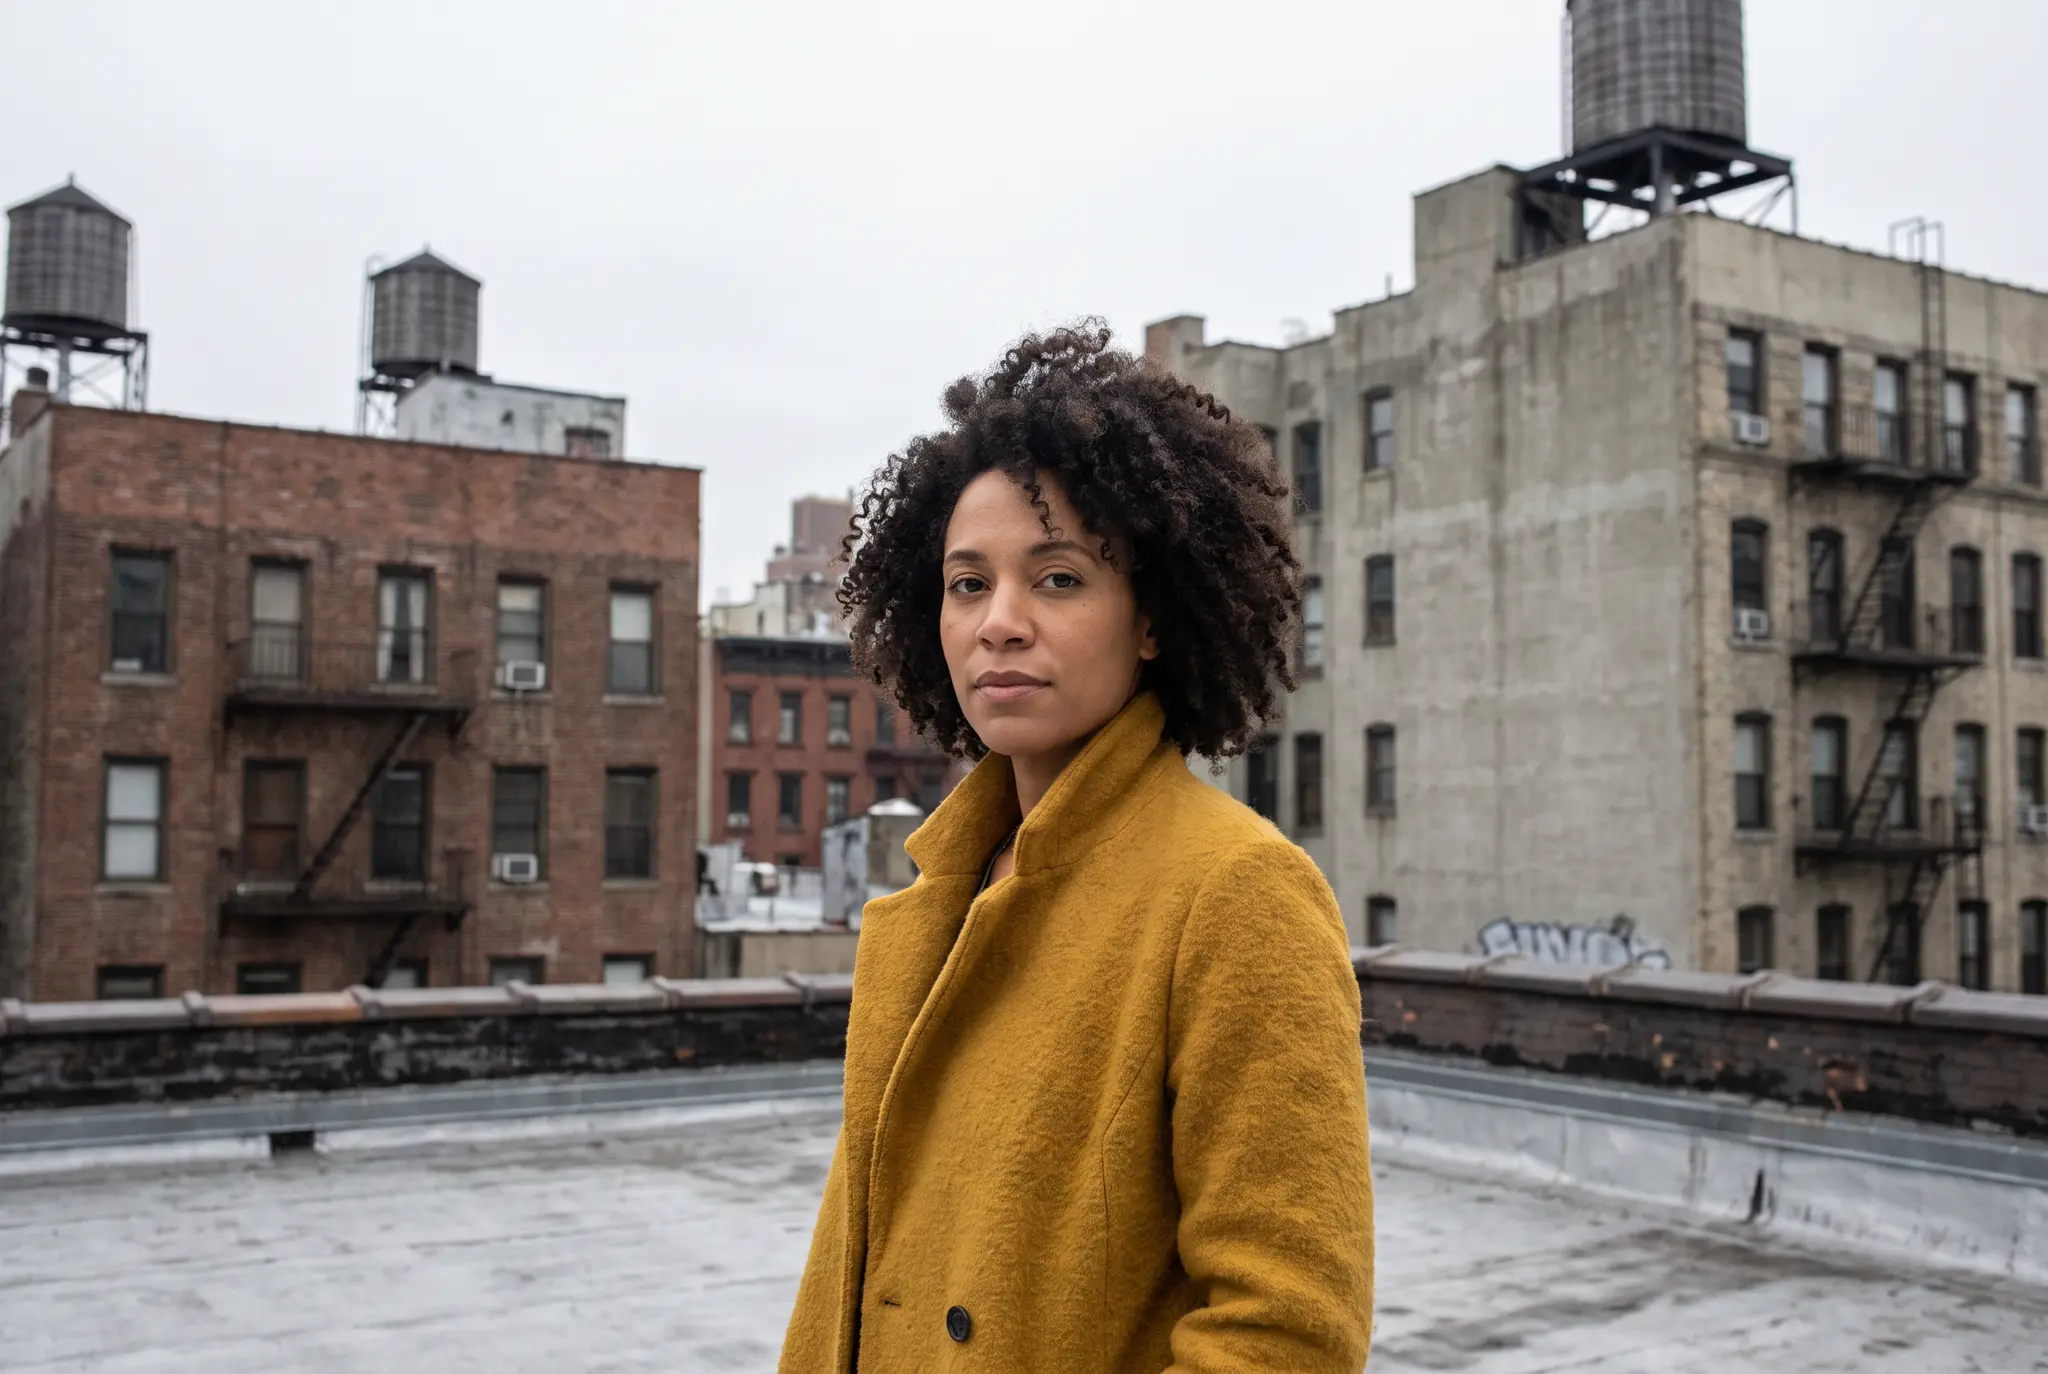 Woman in a mustard coat on a rooftop under a gray sky
Replace the grey overcast sky with a clear golden-hour sky and warm the light on the buildings to match. Keep her face, hair, pose and coat exactly the same.
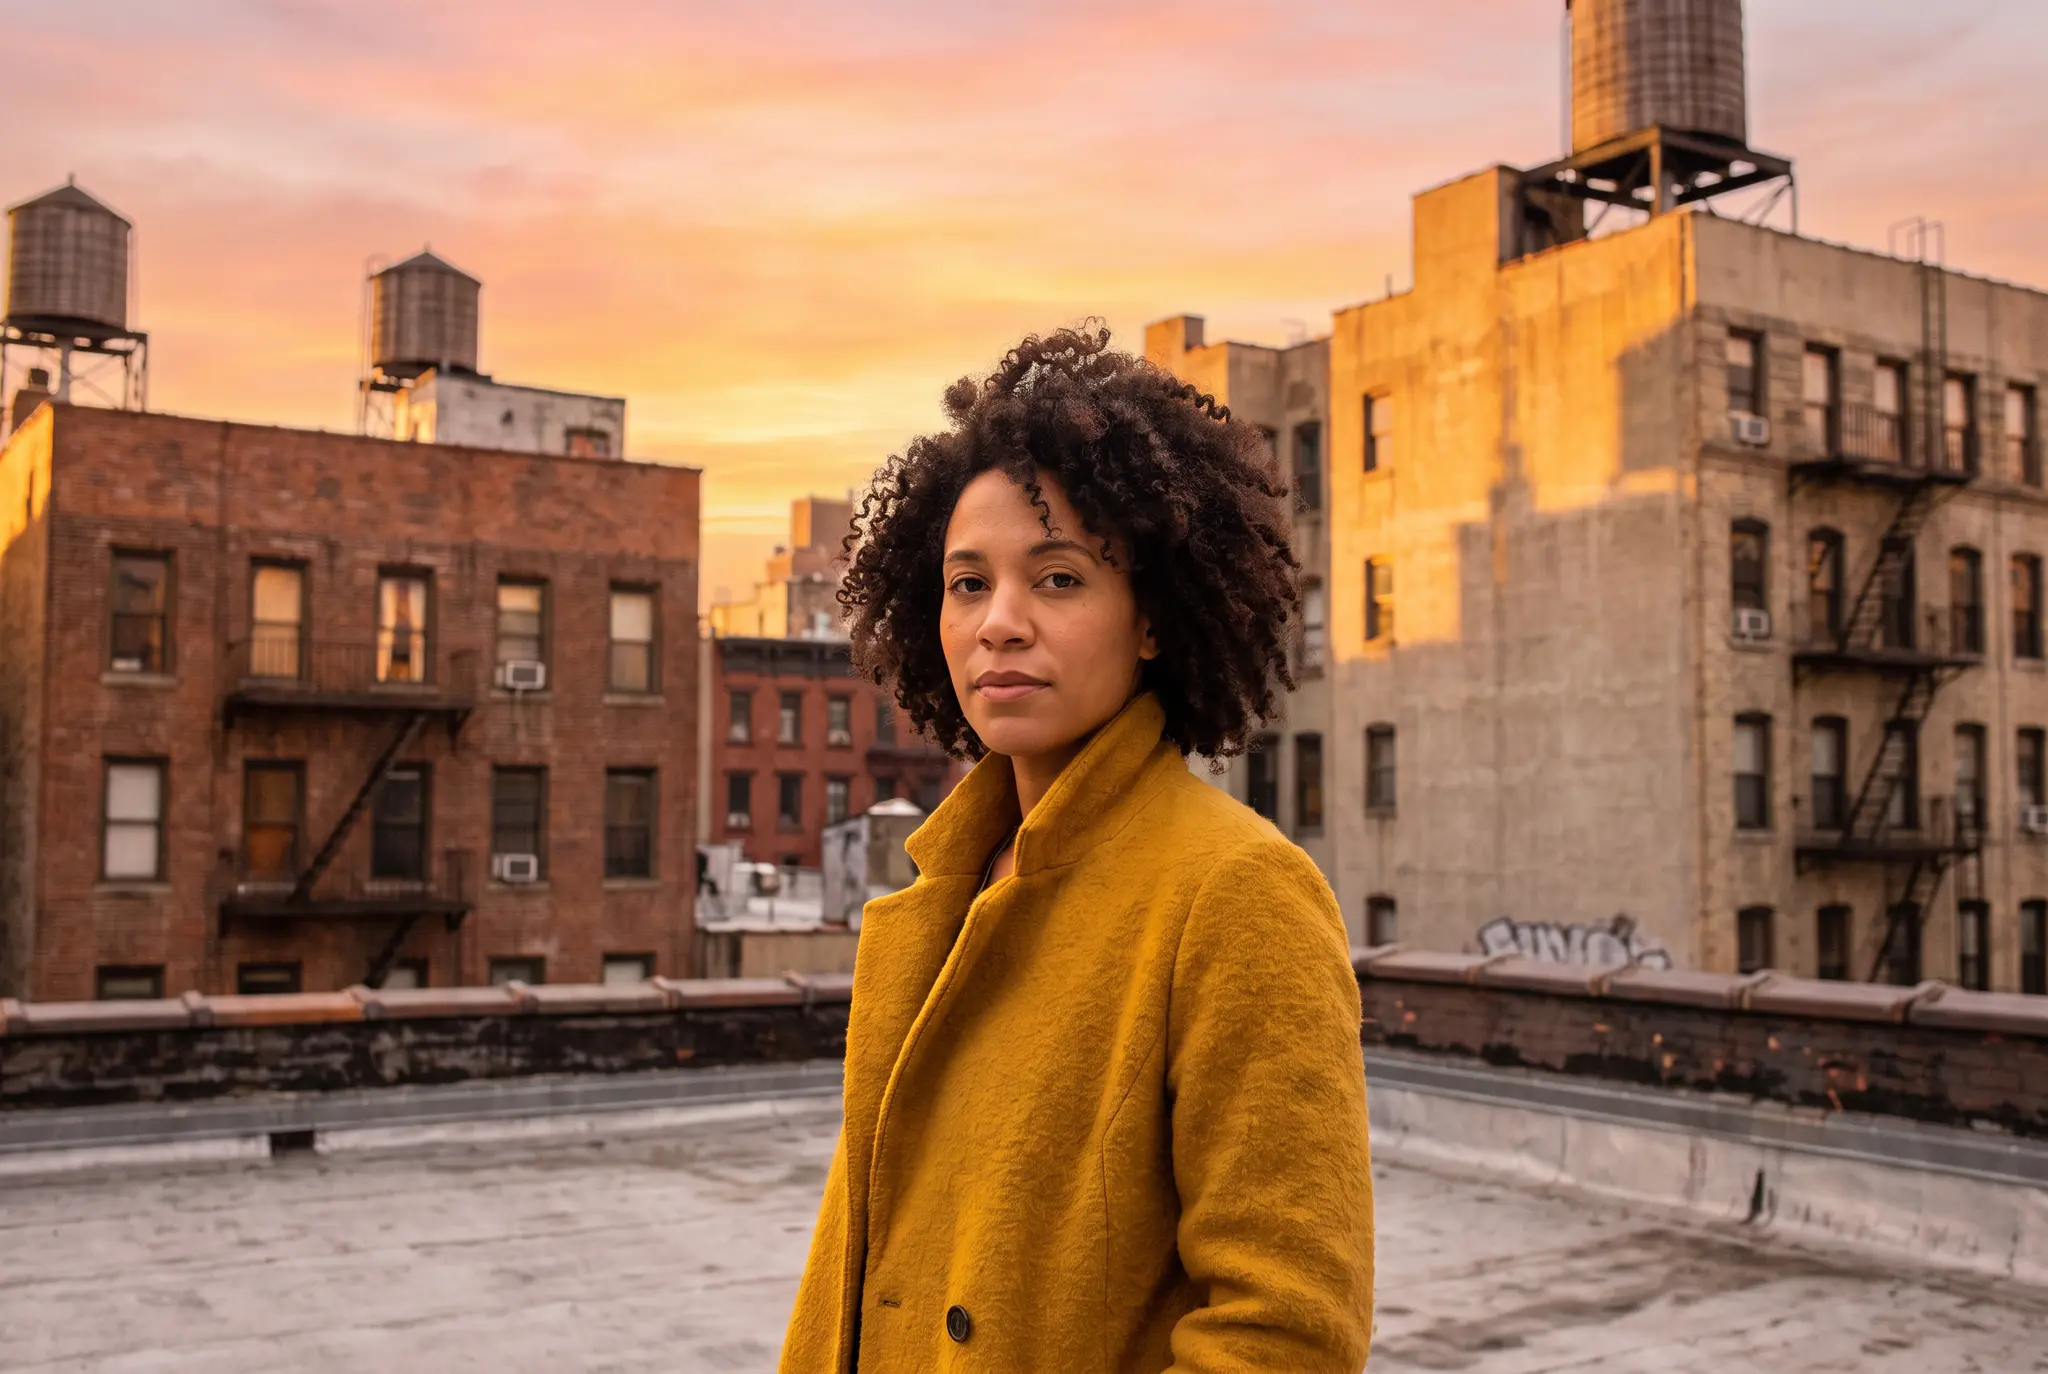 The same rooftop portrait with a golden-hour sky and warm light, subject unchanged
It worked. The sky turned pink-orange, warm side light hit the brick buildings and water towers, and the woman, her curls, coat and pose stayed the same. Framing was essentially unchanged. The "warm the light to match" clause matters: a new sky over old gray light looks pasted on.
Prompts need care in other ways too. Our colorize black-and-white photos guide shows a three-word prompt that regenerated a whole new scene, and a detailed one that didn't.
For more wording that holds up, browse these AI photo editing prompts.
For the general habits, read how to write image prompts.
Which model to pick
ImagineArt's AI image editor runs on Nano Banana Pro by default, and that's the model behind all three edits above. You can switch to others the page lists, including GPT Image 2.5, Seedream 4.5, Flux 3, Flux Kontext, Ideogram 4.5 and ImagineArt 2.0.
Two are worth knowing by name for editing. ImagineArt describes Flux Kontext as the pick for text-based edits that keep your subject; see the Flux Kontext guide.
Qwen Image 2.1 runs in the image tool's edit mode for precise edits with sharp, legible text and takes up to 10 reference images; see Qwen Image Edit.
The same image tool also has dedicated modes: Inpaint, Outpaint, Image Upscale, Relight, Magic Text and Camera Angles.
What it costs and where AI editing falls short
ImagineArt has a free plan; check the current plan limits before you plan a big batch.
Now the limits, because they're real. Our own FAQ says Photoshop still gives more manual control for pixel-precise retouching, print layouts and complex compositing. Microsoft's warning about Generative Erase applies to AI infill everywhere: it "may not be perfect". Edit 1 above is the proof on our side.
The editor also refuses some jobs on purpose. Our FAQ says it blocks sexual or explicit edits of real people, anything involving minors and deceptive edits meant to mislead about a real person. To see how prompt editors stack up against each other, read our roundup of the best AI photo editors.
| Method | Cost | Control | Setup | Best for |
|---|---|---|---|---|
| Phone Photos app | Built in | Sliders, filters, one-tap AI clean-up | Some AI tools need newer devices, an account or a supported region | Quick fixes on photos you just took |
| Photoshop | US$22.99 a month for Single App on an annual plan, billed monthly, as of October 2026 | Layers, masks, healing and clone tools | Desktop install, learning curve | Pixel-precise retouching, composites, print |
| Windows Photos | Built into Windows | Crop, sliders, 15 filters, Generative Erase | Windows only | Free desktop fixes |
| ImagineArt prompt editing | Free plan and paid plans | One typed change at a time, model choice | Browser on any device, JPG, PNG or WEBP up to 30MB | Removals, sky and light swaps, edits you can describe |
Pro habits that keep edits natural
Knowing how to edit photos like a pro is mostly restraint plus checking. Four habits do most of the work.
Compare with the original, often. Windows Photos lets you press and hold, or hit the spacebar, to flash the original. Stare at an edit long enough and your eyes get used to its color, so a quick flip back keeps you honest.
Change one thing at a time. This goes for sliders and prompts alike. ImagineArt's own advice is one change per prompt, and our café test showed what bundling three fixes does. Small steps are also easier to undo.
Check faces and edges at 100%. Hair, glasses, fingers and the line where a sky meets a roof are where both manual and AI edits fail. A photo that looks fine on a phone thumbnail can show a halo at full size.
Save the look for a series. iPhone's Copy Edits and Paste Edits, and Lightroom Classic's Copy Settings dialog, both apply one edit to many photos. A set with one consistent look reads as a set, and you edit once instead of dozens of times.
Should you say when a photo was edited with AI?
Yes, when the edit changes what a photo shows about real people, places or events. A brighter sky on your own holiday snap needs no label. A removed person, an added one or a swapped sky in a listing does. Content Credentials are the standard way to carry that edit history with the file.
Content Credentials work like a pin on the image that shows its origin and edit history. They're built on the open C2PA standard, so the record can travel with the file to platforms that read it. It can also fall off: in a byte check for our content credentials guide, full-size downloads of two ImagineArt outputs carried C2PA data, but their 2048 px web copies didn't, so re-encoding can strip credentials.
Consent comes before disclosure. If an edit removes, adds, retouches or restores a real person, ask them (or their family, for an old portrait) before you share it, and never put someone into a scene they weren't in.
Context decides the rest. A news photo, a property listing, a product image and a dating profile all make promises about what's real. A poster or a fantasy edit doesn't. ImagineArt's editor already blocks deceptive edits meant to mislead a real person, but disclosure on legitimate edits is still your call.
Our guide to content credentials explains how to check whether a photo was edited and how to add the record to your own work.
Start with step one
The short version of how to edit photos: sequence beats software. Keep the original, fix the frame, then light, then color, then the small stuff, and export for where the photo is going. Every app in this guide runs that same order with different buttons.
Phone editors are the fastest start and cost nothing extra. Photoshop and Lightroom win on precision and batches. Prompt editing wins when you can describe the change in a sentence, as long as you ask for one change at a time and check what came back.
Pick the step that's bothering you most and open its guide above. Or upload one photo to ImagineArt's AI image editor, type the single change it needs, and compare the two side by side.
Frequently asked questions
How can I edit my photos for free?
Start with the editor you already own. iPhone Photos, Google Photos and Windows Photos all crop, adjust light and color, apply filters and offer AI clean-up on eligible devices at no extra cost. For prompt-based edits, ImagineArt has a free plan; check the current plan limits before you start.
How do you edit photos on an iPhone?
In the Photos app, choose the picture and tap Edit. Use Enhance for a quick start, then Adjust for Exposure, Brilliance and Highlights, then a filter or Photographic Style. Clean Up removes distractions on devices with Apple Intelligence. Copy Edits and Paste Edits apply the same look to a batch.
Which app is best for photo editing?
It depends on the job. Built-in phone editors cover quick fixes, Lightroom suits large batches, Photoshop suits pixel-level control and prompt editors suit edits you can describe in a sentence. Our app and AI editor roundups, linked above in the phone and AI sections, compare them by task.
How do I start photo editing as a beginner?
Learn the order before the tools: keep the original, crop and straighten, fix light, correct then style color, make local fixes, clean up and export. Practice on one photo at a time and change one thing per step. The order transfers to any app you move to later.
Can AI edit a photo without changing my face?
Often, but not guaranteed. Say what must stay in the prompt ("keep her face, hair and pose exactly the same") and compare the result with your original at full size. In our rooftop test the subject was held. If a face drifts, rerun with a tighter prompt or use a manual tool.
Zahida Misher
Exploring how AI transforms marketing, I help businesses unlock growth and future-proof their presence.