Tooba Siddiqui
March 18, 2026 • Updated July 8, 2026
10 mins Read
For more than a decade, LUTs have been the cornerstone of video color grading. It promised to make the post-production video editing much simpler: one click, and you had the desired cinematic look. The reality? Dozens of LUTs pack downloads and hours of color adjustment, fixing lighting, and tweaking tones.
With AI, video color grading and color correction don't need guesswork or endless testing. You simply instruct the AI, and it perfectly applies the color grade to your clip.
What Is a LUT in Video Color Grading?
A LUT (Look-Up Table) is a static mathematical formula stored as a .cube file. When you apply it during video color grading, it maps one set of color values to another and transforms the colors of each pixel in your footage.
How LUTs Work in Video Color Correction and Grading
LUTs have been quite popular among video editors for converting footage from one color space and tone to another.
For example:
- Log footage from a cinema camera often looks dull and desaturated.
- A "Log to Rec.709" LUT converts it into a standard, viewable format.
Video editors can apply creative LUTs to achieve a specific look:
- Warm cinematic tones
- Vintage film styles
- High-contrast commercial looks
LUTs offer instant color transformation, making them one of the most commonly used video color grading tools/techniques.
Types of LUTs Used in Color Grading Video
Look-Up Tables are divided into different categories, and each LUT serves a different purpose:
- 1D LUTs: Adjust a single channel, like brightness or contrast
- 3D LUTs: Control red, green, and blue values across the full color spectrum
- Technical LUTs: Used for video color correction (log conversions)
- Creative LUTs: Used for stylized color grading and let you apply creative styles to achieve a certain mood or brand-specific colors.
3D LUTs offer more flexibility and richness, making it the most common LUTs in every professional color grading software.
Why LUTs Became the Standard in Color Grading Software
Here are a few reasons why LUTs dominate video color grading:
- Speed: LUTs let video editors apply contrast adjustments, color transformation, and creative styles in a single color, improving video editing efficiency.
- Consistency: LUTs make sure all shots have the same and consistent color grade and baseline, even if each shot was taken with different settings or a different camera.
- Portability: LUTs are accessible and available across different video editing or color grading software.
LUT Limitations: Why It Fails Modern Video Creators
As versatile and powerful as they are, Look-Up Tables have some significant limitations:
The One-Size-Fits-All Problem
LUTs are fixed mathematical formulas and don't analyze your footage. While your video content needs careful tweaking to achieve a certain look. Consider this: you downloaded a 'cinematic warm' LUT pack for your video color grading software. If your video is:
- Shot indoors, with warm tungsten lighting, the LUT looks great.
- Shot outdoors, with cool daylight, the downloaded LUT will give your video an orange and unnatural look.
- Overexposed, the footage will look crushed and muddy.
This isn't your fault. It's how LUTs work.
The Hidden Hectic Workflow
Most experienced video editors are well aware that video color grading and LUT application isn't a one-click process. In fact, it involves:
- Manually balancing white balance.
- Adjusting exposure and shadows
- Applying LUTs
- Adding secondary skin tone corrections
- Fine-tuning the clips.
What most beginner-level video editors do is that they apply an LUT at 100% strength. This makes the skin tones look orangish and unreal, the shadows become muddy, and the highlights often blow out. So, instead of fixing the color grade, LUTs can amplify it — if applied incorrectly.
Accuracy and Artifacts
Not all LUTs have the same characteristics. Lower-precision LUTs can add visual artefacts in your video, such as:
- Color banding in smooth gradients
- Difficulty reproducing accurate achromatic (neutral) colors
Even some 3D LUTs struggle to maintain neutral tones, which can be noticeable in skies, shadows, or skin tones.
Inflexibility
LUTs don't support user input. A LUT can add a cinematic finish to your video content while distorting the skin tone at the same time. In such a case, you can't selectively fix that problem within the LUT. LUTs either apply the whole look or nothing at all.
The AI Alternative: Prompt-Based Video Color Correction
LUTs have been an industry-standard for years, but there's a smarter way to color grade your video: prompt-based AI video color correction. Tools like ImagineArt's AI Video Recolor app analyze your video content, apply desired color adjustment, and customize the entire look with just a single prompt.
How Prompt-Based AI Video Color Grading Works
Instead of browsing and downloading multiple LUTs, you can describe the desired look in natural language. For example:
"Warm, cinematic golden hour with lifted shadows and a slight cyan tint in the highlights"
The AI then:
- Scans your footage for lighting, exposure, and color content
- Applies adaptive transformations to each scene and clip
- Generates a customized color grade in seconds
Key Advantages of AI Video Color Correction Over Static LUTs
| Generation Type | Feature | Duration | 720p Credits | 1080p Credits |
|---|---|---|---|---|
| Pikaframes | Image-to-Video / Text-to-Video | 5 seconds | 8 | 15 |
| Pikascenes | Image-to-Video / Text-to-Video | 10 seconds | 25 | 60 |
| Pikaframes | Image-to-Video / Text-to-Video | 5 seconds | 6 | 12 |
| Pikascenes | Image-to-Video / Text-to-Video | 10 seconds | 18 | 45 |
| Pikaframes | Image-to-Video / Text-to-Video | 5 seconds | 15 | 30 |
| Pikascenes | Image-to-Video / Text-to-Video | 10 seconds | 35 | 100 |
The Hybrid Approach
In reality, most video editors combine the AI video color correction approach with LUTs to get the results they want. It works like this:
- AI as a Base: Generate a primary video color grading look using prompts tailored to your footage.
- Targeted Adjustments: Apply minor corrections or enhancements where needed.
- Final Touches: Use traditional LUTs only if a specific compliance standard or archival format requires it.
This approach lets creators achieve a consistent look and adaptable results, combining the intelligence of AI with the precision of traditional color grading software. The result is professional-quality video color grading that's tailored to your specific footage.
Step-by-Step: How to Use AI for Video Color Grading
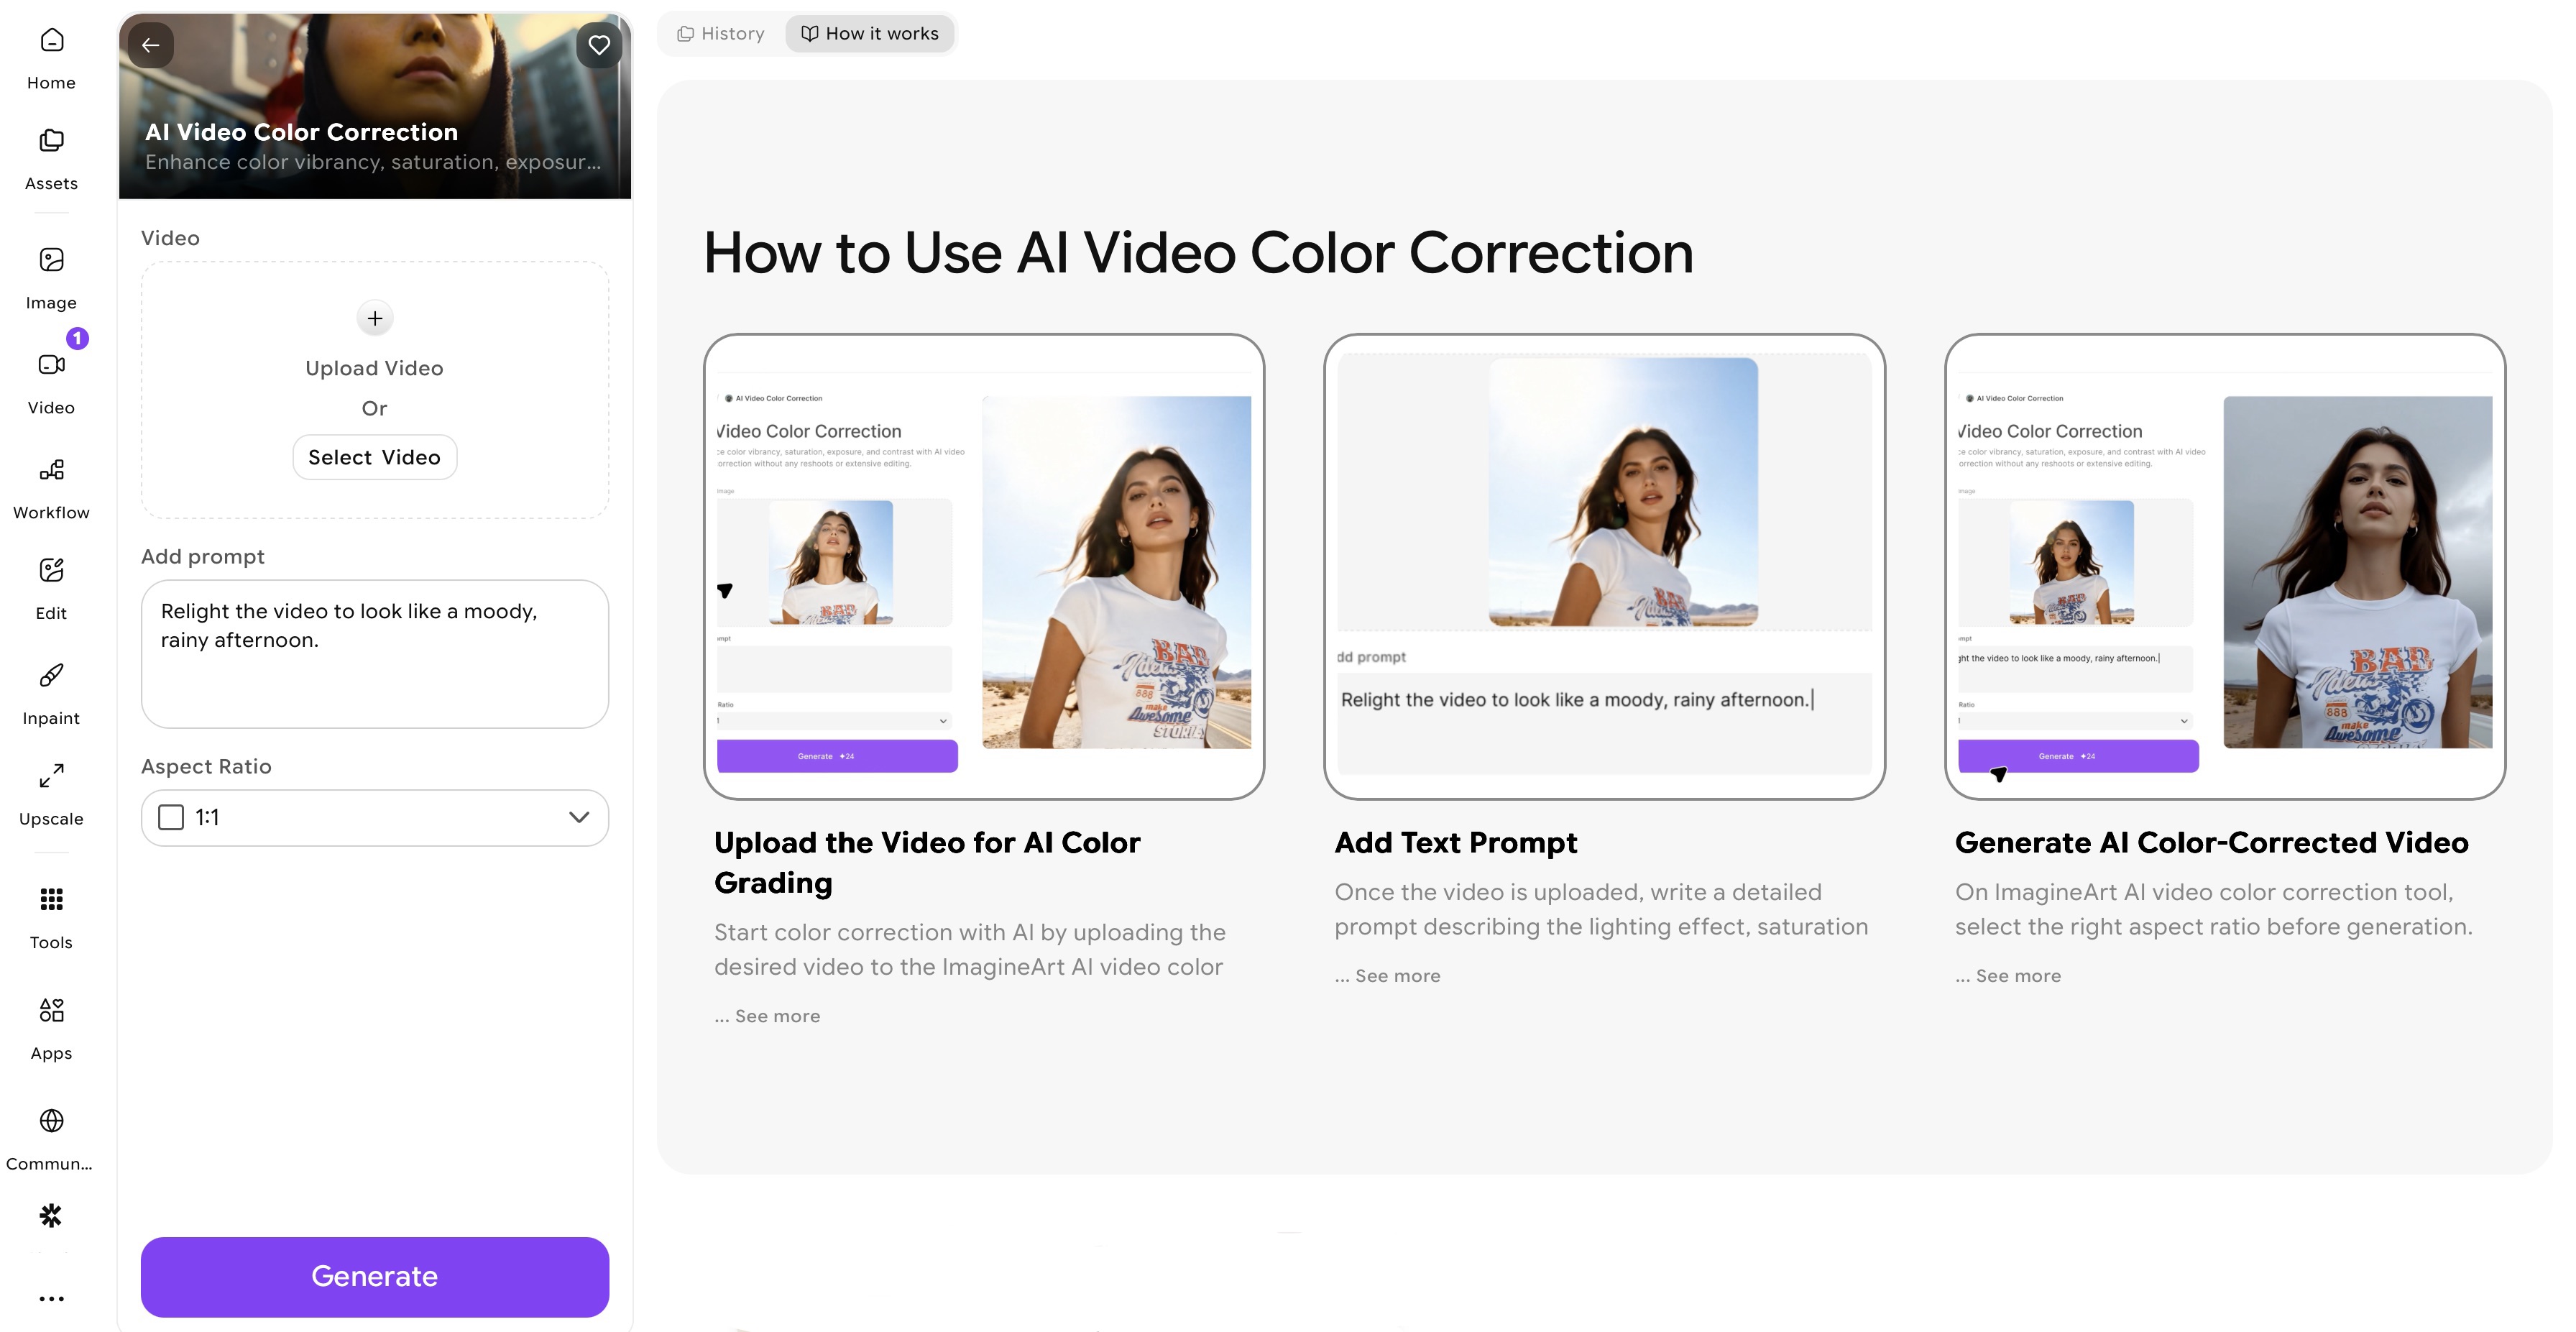 ImagineArt AI Video Color Correction app dashboard
With ImagineArt AI Video Color Correction app, you can experiment with creative styles without downloading a handful of LUTs or making manual adjustments. Here is how to use ImagineArt AI for video color grading:
Step 1: Import Your Video
- Open the ImagineArt AI Video Color Correction app and click “Upload Video”.
- Select the clip you want to color grade. You can even generate a video on ImagineArt using the AI video generator.
- The platform supports different formats, including MP4, MOV, and common cinema camera exports.
Step 2: Write Prompt
Enter a detailed prompt, including details about saturation, hues, exposure, white balance, or AI color contrast. You can even colorize black-and-white video using the AI color corrector.
Example prompt:
“Warm cinematic golden hour look with lifted shadows and slightly teal highlights”
Step 3: Let the AI Analyze Your Footage
Once you enter the prompt and select the desired aspect ratio, the AI color corrector scans your clip and:
- Detects lighting conditions, exposure, and color temperature
- Identifies subjects like faces, products, or landscapes
- Preserves skin tones automatically
Step 4: Preview & Fine-tune
ImagineArt AI Video Color Correction app takes a minute to produce the color-graded video. Review the generated video, and if needed, tweak your prompt for quick variations. You can refine and enhance the video color palette using the built-in ImagineArt AI video editor.
Step 5: Export Your Color-Graded Video
Once satisfied, click the ‘Download’ button, and you will have a publish-ready color-graded video.
Step 6: Iterate as Needed
One of the biggest advantages of AI color grading is instant iteration:
- Want a warmer feel? Edit your prompt and regenerate.
- Want to colorize video? Mention the desired color palette and let AI recolor.
In minutes, what used to take hours of manual video color correction and LUT testing is complete.
Recommended read: How to Color Correct Video
Practical Prompts for AI Video Color Grading
Here are proven prompts for different video types. Copy, paste, and modify:
For YouTube Vlogs:
"Warm, engaging, bright, natural skin tones, lifted shadows,
slightly increased contrast, vibrant but not oversaturated"
 Video Color Grading Example for YouTube Vlogs
For Cinematic Short Films:
"Cool-warm contrast, moody shadows, cinematic color grading,
lifted blacks, desaturated greens, skin tone protection"
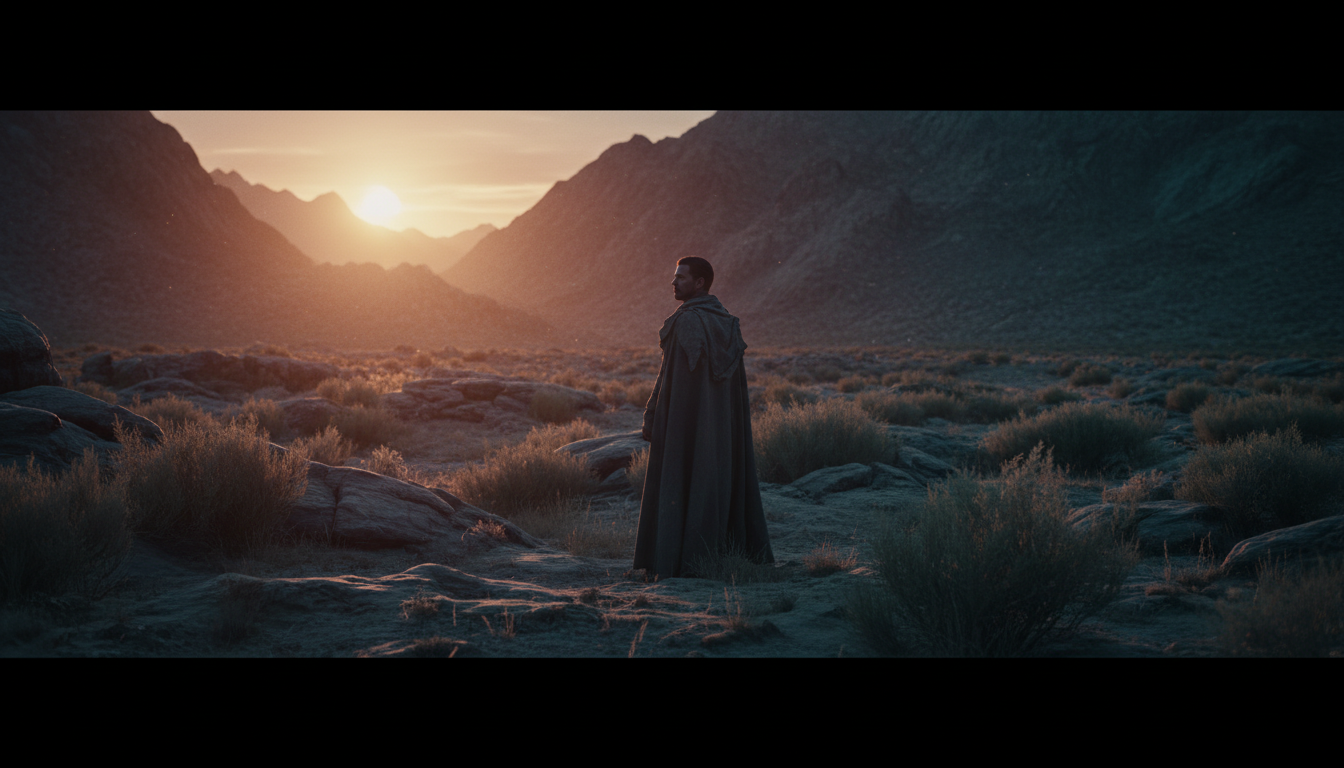 Video Color Grading Example for Cinematic Films
For Product/Commercial Videos:
"Bright, clean, punchy colors, natural skin tones,
increased saturation, high contrast, professional"
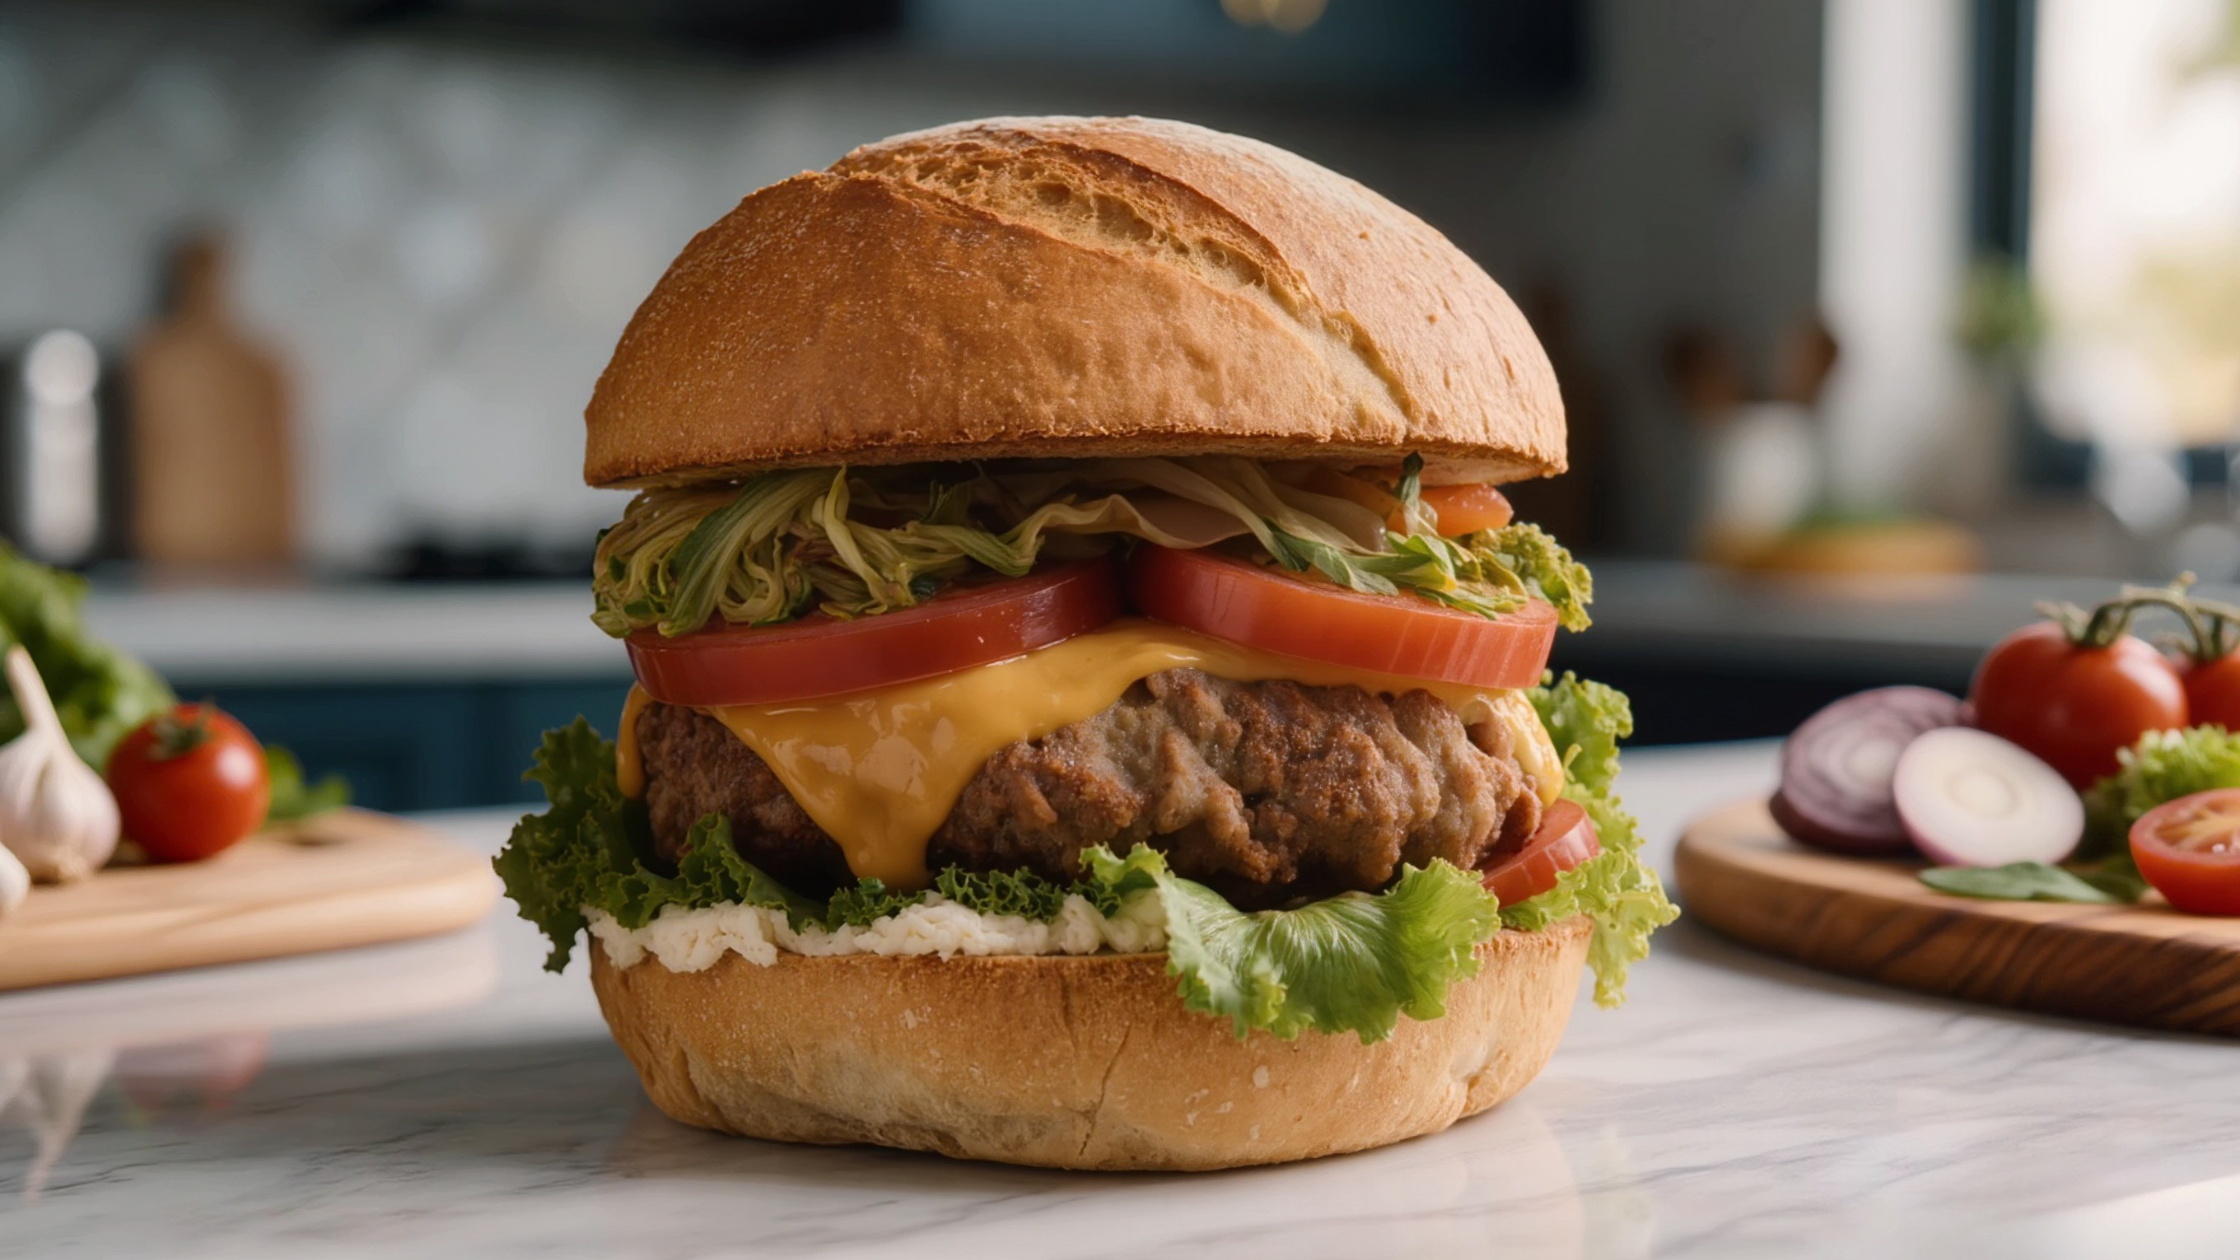 Video Color Grading Example for Product Commercial
For Interviews/Talking Heads:
"Neutral, professional, natural skin tones, even lighting,
soft shadows, minimal color cast"
For Travel/Adventure Content:
"Warm, golden hour, saturated colors, lifted shadows,
cinematic, slightly desaturated greens"
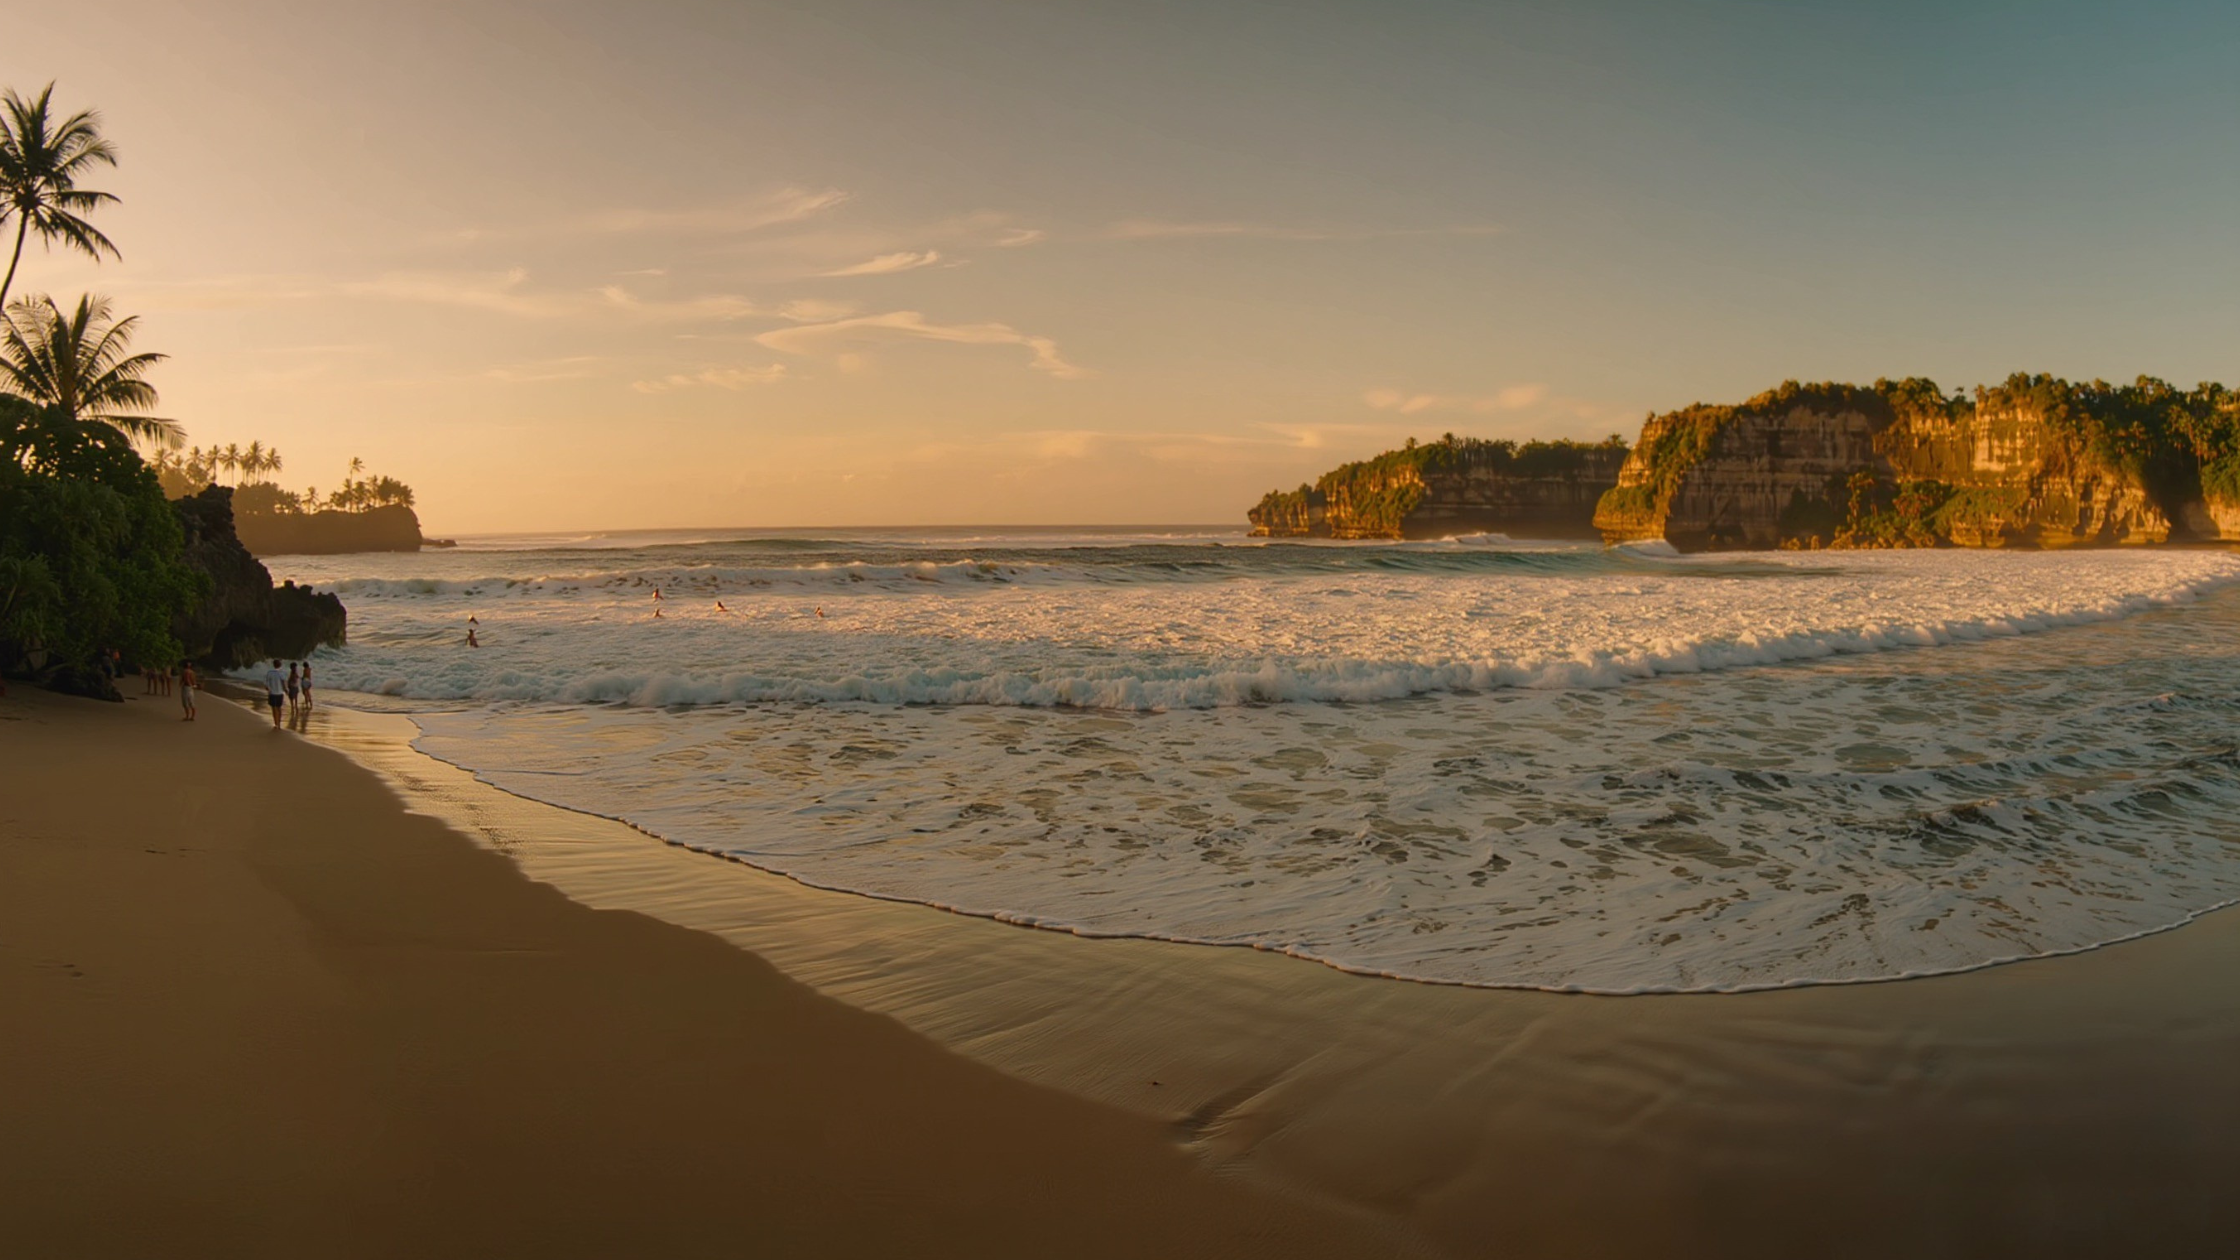 Video Color Grading Example for Travel Content
When to Use: AI Video Color Grading vs LUTs
Use AI Color Grading When:
- Working with mixed lighting conditions.
- You want to work fast without technical knowledge.
- You need automatic skin tone protection.
- Working with AI-generated or synthetic video.
- You want unlimited customization via natural language prompts.
Use LUTs When:
- Working with professional log footage (ARRI, RED, Sony).
- Broadcast delivery requiring strict color space compliance.
- Color-matching 100+ identical clips from the same camera/lighting.
- Offline processing requirements.
- Client-specified LUT-based workflows.
Tips for AI Video Color Grading
Tip 1: Write Descriptive Prompts
Vague: Make it look good.
Better: Warm, cinematic, lifted shadows, natural skin tones, high contrast.
Specificity generates better results. Use clear phrases to describe temperature, mood, and color adjustments.
Tip 2: Skin Tone Protection
Include clear instructions about preserving the natural skin tone in your prompt for realistic results. This ensures:
- No muddy faces
- No orange cast
- No blown-out highlights on skin
Tip 3: Account for Output Platform
Different platforms require different aspect ratios. Make sure to select the right one.
- YouTube: 16:9 for main videos; 9:16 for YouTube Shorts
- Instagram: 9:16 for Reels, 1:1 for square posts, and 4:5 for portrait posts.
- LinkedIn: 4:5 or 1:1
Recommended read: Video Editing Tips
Ready to Color Grade Video with AI?
Professional video editing no longer requires expensive color grading software or hours of adjustments. With AI, all you need is a prompt and a few seconds to color grade your video. So, stop downloading the LUT packs, start describing the look you want, and let ImagineArt's AI Video Recolor app handle the rest.
Frequently Asked Questions
What is video color grading?
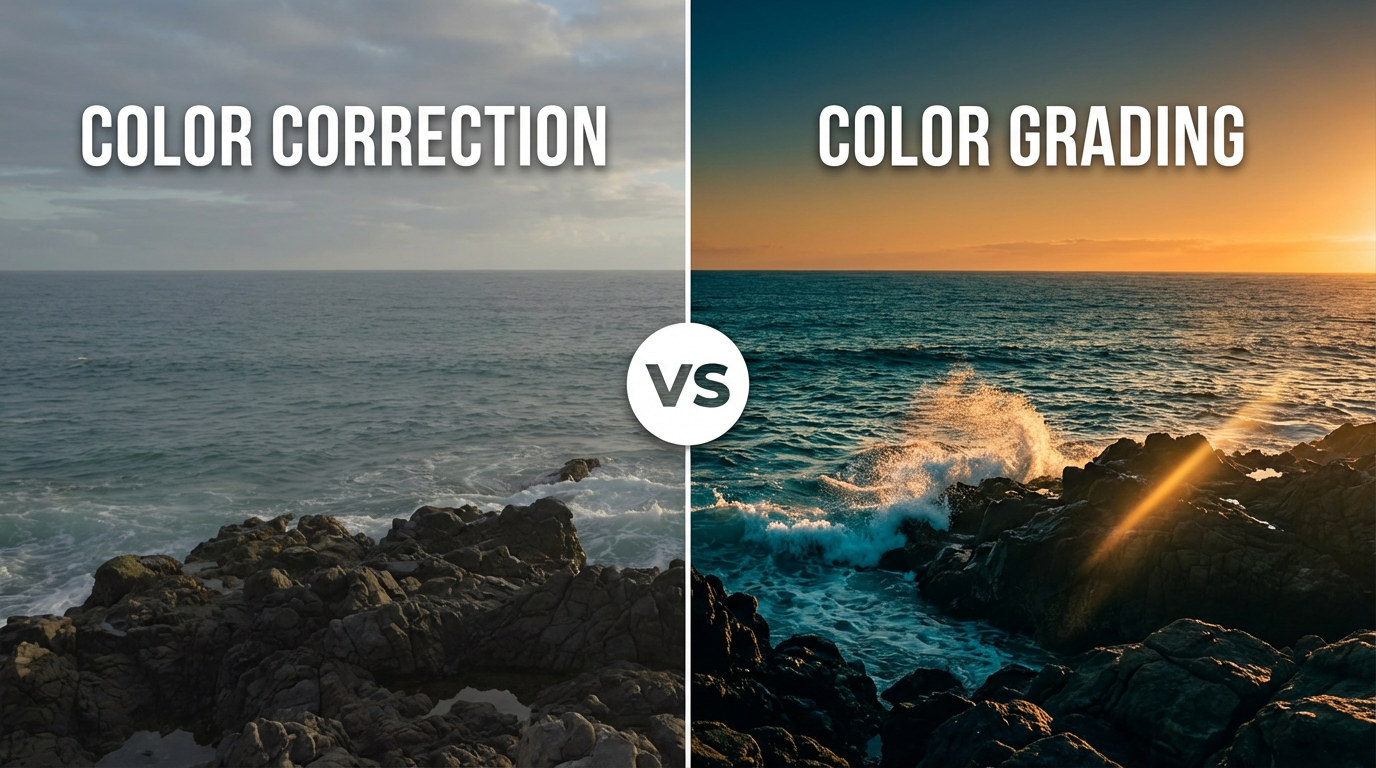
Video color grading is the process of enhancing and stylizing footage to achieve a specific look or mood. It goes beyond basic color correction, which focuses on fixing exposure and white balance, by adding cinematic tones, contrast, and visual consistency across scenes.
What are LUTs in video color grading?
LUTs (Look-Up Tables) are preset files used in color grading software to map one set of colors to another. They are commonly used to convert flat log footage into a standard format or to apply a specific visual style quickly.
Why do LUTs sometimes look bad on my footage?
LUTs are static and don't adapt to your footage. If your lighting, exposure, or white balance doesn't match the LUT's intended conditions, the result can include unnatural skin tones, crushed shadows or highlights, and inconsistent color across clips.
Is AI color grading better than LUTs?
For most creators, yes. AI color grading offers adaptive adjustments, faster workflows with less trial and error, better skin tone handling, and more flexibility through prompts. However, LUTs still have value in controlled or professional pipelines where consistency and standardization are required.
What is the best color grading software?
The best color grading software depends on your needs. For speed and ease of use, AI tools are becoming the preferred choice for creators. Tools like ImagineArt's AI Video Recolor offer faster, prompt-based video color grading.
Recommended read: Color Grading vs Color Correction in AI Video
Tooba Siddiqui
Tooba Siddiqui is a content marketer with a strong focus on AI trends and product innovation. She explores generative AI with a keen eye. At ImagineArt, she develops marketing content that translates cutting-edge innovation into engaging, search-driven narratives for the right audience.