
Syed Anas Hussain
Fri May 15 2026 • Updated Sat May 16 2026
10 mins Read
Most AI photo editors hand you a set of preset filters and call it "AI editing." ImagineArt 2.0 Edit does something fundamentally different: you type what you want changed, in plain English, and the model executes it — adjusting lighting, replacing backgrounds, removing objects, and regrading colour, all without touching a single slider. This guide walks you through exactly how to edit images with AI using ImagineArt 2.0 Edit, from your first upload to a polished 2K export.
What Is AI Photo Editing with Text Prompts?
AI photo editing with text prompts is the process of describing image changes in plain language — and having an AI model apply those changes automatically, without manual adjustments, masking, or layer-based tools. You type "replace the background with a golden-hour beach" or "remove the bench on the left," and the model handles the technical execution.
ImagineArt 2.0 Edit is built specifically for this workflow. It's ImagineArt's most realistic AI editing model — fine-tuned for high-detail output and the finest finish quality in the lineup. Unlike general-purpose image generators, 2.0 Edit is trained to modify existing photos while preserving subject integrity, making it purpose-built for editing real photographs rather than generating from scratch. Inpainting — the ability to paint over a specific region and describe only what changes there — makes it possible to edit one part of an image without touching the rest.
Style transfer is the process of applying a new visual aesthetic (colour palette, film stock, artistic style) to a photo using a text description, without manual colour grading.
What Can You Edit with AI?
AI image editing online has expanded well beyond basic retouching. ImagineArt 2.0 Edit handles seven distinct categories of edits, all driven by text prompts.
- Background replacement — Swap any background using a text description. The model automatically adjusts the subject's lighting to match the new scene — no manual compositing needed.
- Style transfer and colour grading — Describe a visual style ("moody cinematic, desaturated blues") and the model reinterprets the photo's colour palette accordingly.
- Object removal or replacement — Select a region with the inpainting brush and describe what should replace the removed element.
- Skin retouching — Smooth texture, correct uneven lighting, and adjust skin tone through a single prompt.
- Lighting correction — Fix underexposed shots, balance harsh shadows, or add a specific light source.
- Environment and context changes — Change the time of day, weather, season, or location of an outdoor photo.
- Targeted inpainting edits — Paint over a specific area and describe exactly what changes there, leaving everything outside the selection untouched.
The critical distinction between a global text edit and inpainting: global edits affect the whole image; inpainting lets you isolate a specific region for surgical precision on complex edits.
How to Edit Photos with AI Using ImagineArt 2.0 Edit
Editing a photo with ImagineArt 2.0 Edit takes five steps. The tool runs entirely in your browser — no download required — and is available on ImagineArt's free plan with no credit card needed.
Step 1: Go to ImagineArt 2.0 Edit and Upload Your Photo
Open ImagineArt 2.0 Edit at imagine.art/image. Choose ImagineArt 2.0 as the model. Click the upload area or drag and drop your image file (JPG or PNG). Your photo loads into the editing canvas and is ready for your first prompt.
Pro tip: Use a clean, well-lit source photo for best results. Heavily compressed or blurry inputs limit what the model can recover.
Step 2: Describe Your Edit in the Text Prompt Field
Type your edit instruction in plain language. Specificity is everything. Instead of "make it look better," write "warm golden-hour lighting, blurred garden background, shallow depth of field." The model interprets photographic terminology — colour temperature, depth of field, light direction — more accurately than vague adjectives.
Good prompts for global edits:
- "Professional headshot lighting, clean grey studio background"
- "Cinematic colour grade, teal and orange palette, slight vignette"
- "Daylight to sunset — replace the sky with a deep orange dusk scene"
Step 3: Try Inpainting for Targeted Edits
For edits that should only affect one area of the photo, inpaint a specific region you want to change by explaining it in the prompt — a person's outfit, a background element, an object in the scene — describe what should appear there.
Example: To change a white T-shirt → type "Change the white T-shirt to burgundy crew-neck jumper, fabric texture visible" → the model replaces the outfit without touching anything else.
Step 4: Set Quality to High for 2K Output
Before generating, set the quality setting to High. ImagineArt 2.0 Edit outputs at 2K resolution at this setting — suitable for print, social media, and professional delivery. Standard quality is faster for prompt iteration; High quality is for your final export.
Step 5: Generate and Export
Click Generate. Review the output. If the result isn't quite right, refine your prompt and regenerate — small wording changes often produce significantly different outputs. When satisfied, click Export to download your edited image at full resolution.
5 AI Photo Editing Use Cases (with Real Prompts)
Use Case 1: Background Replacement with Auto Lighting
The scenario: You have a product shot taken in a plain studio, and you need it placed in a lifestyle setting for an e-commerce campaign.
What to do: Upload the product image and describe your target background: "cosy kitchen countertop, warm morning light, soft focus background." ImagineArt 2.0 Edit replaces the background and recalibrates the subject's lighting to match the new environment — the product looks placed, not pasted.
Prompt:
"Rustic wooden dining table background, warm afternoon sun, shallow depth of field, lifestyle photography style"
This is one of the highest-value commercial applications of AI image editing online — brands that shoot products on white can generate versatile lifestyle imagery in minutes.
Use Case 2: Colour Grading and Style Transfer
The scenario: You need a batch of photos to share a consistent cinematic look for a brand campaign.
Prompt:
"Desaturated matte film look, lifted shadows, teal shadows and warm highlights, editorial magazine style"
Apply the same prompt across multiple images for consistent style transfer — no Lightroom presets, no manual colour wheels.
Use Case 3: Object Removal or Replacement via Inpainting
The scenario: A distracting element in the background — a bin, a sign, a stranger — is ruining an otherwise strong photo.
What to do: Use the inpainting brush to cover the unwanted object. Type what should replace it: "empty street, continuation of the brick wall behind." The model fills the selection with contextually appropriate content.
Pro tip: Always describe what should replace the removed element, not just "remove this." Telling the model what to put there improves coherence significantly.
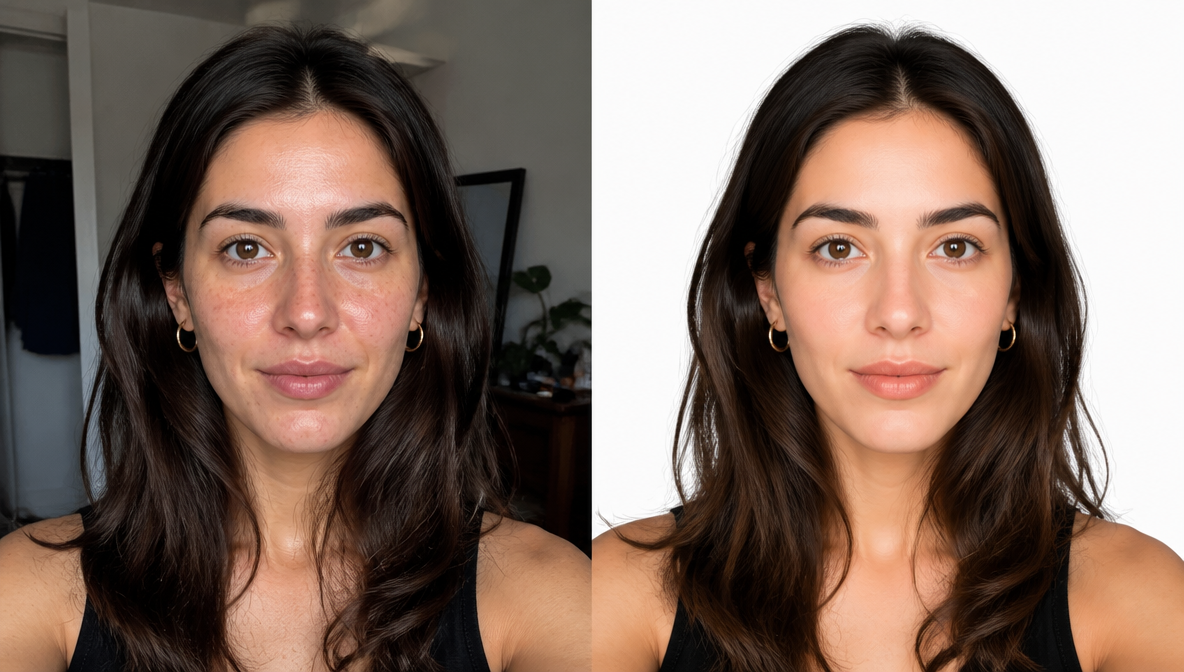
Use Case 4: Skin Retouching and Lighting Correction
The scenario: A portrait with harsh, uneven lighting that makes the subject look underlit and tired.
Prompt:
"Even soft studio lighting, smooth skin texture, remove dark circles under eyes, maintain natural skin tone"
For precise control over specific spots, use inpainting to target individual areas rather than applying changes globally across the face.
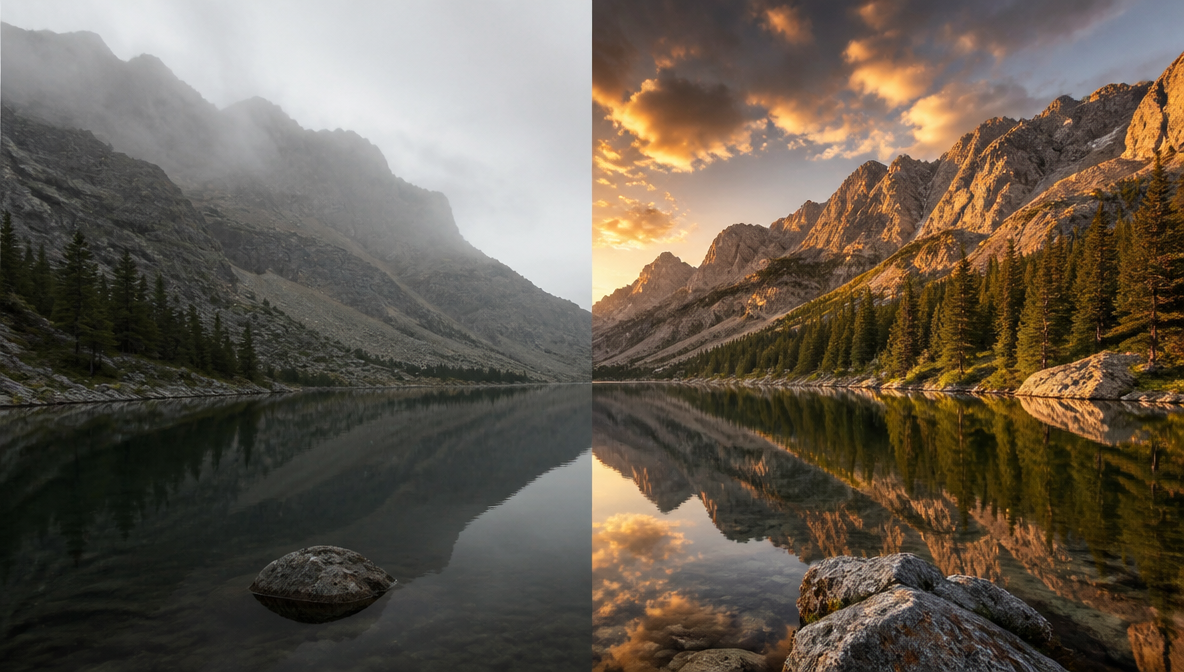
Use Case 5: Creative Environment Changes
The scenario: An outdoor portrait shot in flat, grey midday light. You want the same photo in golden hour.
Prompt:
"Golden-hour sunlight from the right, long warm shadows, sky replaced with deep orange-pink sunset, lens flare"
The model adjusts ambient light, sky, and shadow direction to match the described environment — a task that would take an hour in Photoshop and seconds here.
Tips for Better AI Photo Editing Results
Getting great results from an AI photo editor text prompt tool comes down to prompt precision and knowing when to use global edits versus inpainting. These tips apply in 2026 whether you're editing one photo or a hundred.
1. Be specific, not vague. "Better lighting" fails. "Soft diffused studio lighting from the left, fill light from the right" succeeds. The model responds to photographic terminology — aperture, light direction, colour temperature, depth of field.
2. Describe the result, not the action. Don't write "change the sky." Write "replace sky with deep blue overcast, slight cloud texture, moody atmosphere." The model needs to know what it's building, not just what to remove.
3. Use inpainting for anything that shouldn't change. If you only want to edit the background and not the subject, use inpainting. Global prompts affect the entire image — including elements you want to keep exactly as they are.
4. Iterate in Standard quality, finalize in High. Standard quality renders faster and is perfect for testing different prompt approaches. Once you've found the right wording, switch to High quality for the 2K final.
5. Combine ImagineArt tools for a full creative workflow. After editing, use ImagineArt's Background Remover to isolate your subject for compositing. The ImagineArt Image Studio takes you further — generation, upscaling, and style-reference workflows. If you're starting from scratch, the AI image generator lets you create a base image before bringing it into 2.0 Edit for refinement. Explore the full feature set to see everything ImagineArt offers across image, video, and voice.
6. Reference real visual styles. "Wes Anderson colour palette," "Gordon Parks documentary photography," or "VSCO A4 preset" all communicate aesthetic intent the model understands well. Style references produce more directed results than abstract adjectives like "beautiful" or "artistic."
7. Save your best prompts. When a prompt produces exactly what you wanted, save it. The same wording often works reliably across different photos — especially for colour grading and environment changes.
Frequently Asked Questions
ImagineArt 2.0 Edit is an AI photo editing model that lets you describe changes to a photo in plain text — and applies them automatically. It supports global text-prompt edits, inpainting for region-specific changes, automatic background lighting adjustment, and 2K resolution output. It's available free at imagine.art/image with no credit card required.
Yes. ImagineArt 2.0 Edit is available on ImagineArt's free plan with no credit card required. You can upload a photo, describe your edit in plain language, and download the result. Free plan access lets you test the full editing workflow — text prompts, inpainting, and background replacement — before deciding whether to upgrade.
Inpainting is an AI editing technique where you paint over a specific region of an image and describe what should appear there. Unlike global text edits that affect the whole photo, inpainting isolates your change to the selected area — letting you replace an object, retouch a specific spot, or fix a background element without affecting the rest of the image.
In ImagineArt 2.0 Edit, you describe the new background in the prompt field and the model replaces it automatically. The standout capability is automatic lighting adjustment — the model recalibrates the subject's lighting to match the new scene, so the result looks naturally composed rather than digitally pasted in.
ImagineArt 2.0 Edit outputs at 2K resolution when quality is set to High. This is suitable for professional use including print, e-commerce product imagery, social media, and editorial content. Standard quality mode renders faster and is ideal for testing and iterating on prompts before committing to a final high-resolution export.
Yes — this is what inpainting does in ImagineArt 2.0 Edit. Use the brush tool to paint over the region you want to change, enter a text prompt describing the desired result, and the model applies the edit only within your selection. Everything outside the painted area stays completely untouched.
Traditional editors like Photoshop require manual operations — masking, layer adjustments, brush work, and colour correction tools, all requiring significant technical skill. AI photo editing with text prompts lets you describe the outcome in plain language and the model handles the technical execution. Most edits that would take 30–60 minutes in Photoshop take seconds with ImagineArt 2.0 Edit.
Edit Any Photo — Without the Learning Curve
AI photo editing has crossed a real threshold. The gap between "describe what you want" and "get what you described" has narrowed to the point where a well-written text prompt produces professional-grade results. ImagineArt 2.0 Edit is built for exactly this — text-prompt editing, inpainting, automatic lighting compensation, and 2K output, all available on a free plan with no credit card needed.
The best way to understand what's possible is to edit a photo that's been sitting in your drafts waiting for the right tool. Open it, type what you want, and see it.
Syed Anas Hussain
Syed Anas Hussain is a computer scientist blending technical knowledge with marketing expertise and a growing passion for AI innovation. Curious by nature, he dives into new AI sciences and emerging trends to produce thoughtful, research-led content. At ImagineArt, he helps audiences make sense of AI and unlock its value through clear, practical storytelling.